
Showing posts with label Free Plans. Show all posts
Showing posts with label Free Plans. Show all posts
Thursday, July 26, 2012
Drawer Dividers DIY - Simple
I have used these drawer dividers in my shop for a while now and they work great. Thought I would share them in a video!
Saturday, December 31, 2011
Simple Drawer Making - A How To Video
I was making some drawers the other day for a couple of vanities when I got the idea to make a video on how I build my easy - simple drawers in my woodworking shop. This method doesn't use and complicated joinery or any specialized tools. If you have every feared making drawers like I once did then try this route and you should be able to take drawers on easily.
Thank you all for watching!
Monday, February 7, 2011
How to build a Lumber Rack Video- Better than free plans!
I definately needed a lumber rack in my new small shop so I got to looking around the internet at other people's ideas and builds and most of them seemed pretty complicated or they protruded out from the wall to much for my small shop.
I came up with a simple but strong design that doesn't force you to sacrifice space nor does it take alot of tools, materials, or complicated jointery to build. In my small shop I am trying to put alot of things on wheels and this lumber rack is not built all the way to the floor so that I can roll tools underneathe it.
So take some time to watch this video and build yourself a great lumber rack.
I do consider this a meduim duty lumber rack but you could easily add two more uprights with supports between these making them 16" on center rather than my 32" on center. This would add alot of extra strength is you decided to load it up excessively.
Friday, July 9, 2010
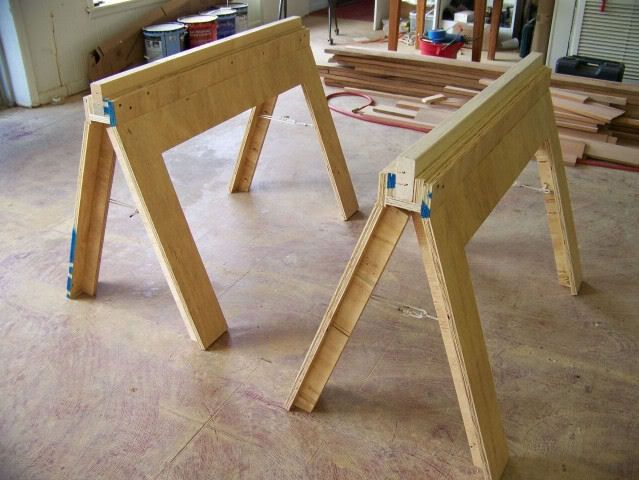
DIY Folding Sawhorses - Version 2.0 with Free Plans
I am calling this free plans, I have the cutout photo of a sheet of plywood with the dimensions on it. The rest pretty straight forward I believe. But, while I was building this set I was video taping a how to video and hopefully that will be up and running online soon which should make everything very simple.
The original sawhorse design was a great one, the only things I really changed for the 2.0 version were the height of the horses, the width of the horses, and the width of the leg panels. The changes made now allow for nearly, if not all of the materials to be cut out of one sheet of plywood (on the computer it says it can be done, but when I tried I failed somehow). The working height could be lowered still to enable you to get everything out of one piece except for the 2x4 top piece, but that would lower the working height to a level to low for my personal preference.
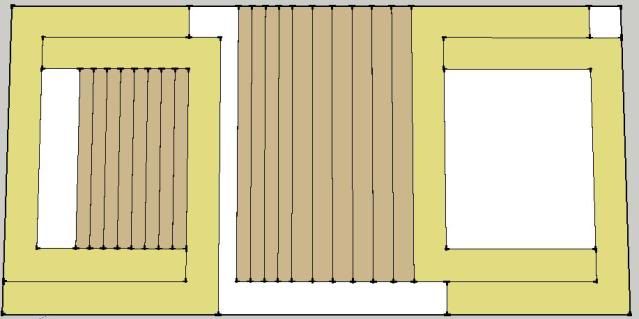
The working height in version 2.0 is approximately 31" which uses a leg panel height of 28", and the width of the sawhorses are nearly 43". The width of a leg panels is 5" which allows you to cut two leg panels out of a 48"x33" section of 3/4" plywood. It may be difficult to understand but I will have a image of the cut list soon which will help clear everything up.
Everything else is the same as the original version.

I built a set of these about three of four weeks ago and have been using them on remodeling and construction jobs and they are holding up great. I have had easily over 100 8' pieces of tongue and groove pine on them along with a miter saw and they never showed any signs of weakness. Everyone who comes to the jobs takes a close look at the sawhorses and asks my boss man where he got them, it feels good when he points at me and says "He built them, not me".
The construction is pretty simple and I think you should be able to simply recreate your own. I did however make a cut list type thing on Sketch up that shows how you can get the pieces easily out of one sheet of plywood.

The "U" shaped leg panels are 28" tall and about 42 15/16" long and 5" wide on all three segments. When it is laid out on a sheet of plywood I center my saw blade on the line since I am using both pieces on either side of the blade.
The rest is pretty easy, 6 pieces 3" x about 42 15/16" (four of them with an 18* bevel cut down one long side) and 4 at 2". Then from the inside of a leg you cut 8 pieces that are used for the inside of the legs for support.
Here is a video helping with the building process. I go into some detail about assembly and remind you of a few things, check it out.
More detailed photo's and descriptions are availiable in this post that should aid in the the building process.
If anyone has and questions of comments feel free. Don't forget about The Woodworking Trip, there should be a video on these things coming soon. Thank you!
The original sawhorse design was a great one, the only things I really changed for the 2.0 version were the height of the horses, the width of the horses, and the width of the leg panels. The changes made now allow for nearly, if not all of the materials to be cut out of one sheet of plywood (on the computer it says it can be done, but when I tried I failed somehow). The working height could be lowered still to enable you to get everything out of one piece except for the 2x4 top piece, but that would lower the working height to a level to low for my personal preference.
The working height in version 2.0 is approximately 31" which uses a leg panel height of 28", and the width of the sawhorses are nearly 43". The width of a leg panels is 5" which allows you to cut two leg panels out of a 48"x33" section of 3/4" plywood. It may be difficult to understand but I will have a image of the cut list soon which will help clear everything up.
Everything else is the same as the original version.
I built a set of these about three of four weeks ago and have been using them on remodeling and construction jobs and they are holding up great. I have had easily over 100 8' pieces of tongue and groove pine on them along with a miter saw and they never showed any signs of weakness. Everyone who comes to the jobs takes a close look at the sawhorses and asks my boss man where he got them, it feels good when he points at me and says "He built them, not me".
The construction is pretty simple and I think you should be able to simply recreate your own. I did however make a cut list type thing on Sketch up that shows how you can get the pieces easily out of one sheet of plywood.
The "U" shaped leg panels are 28" tall and about 42 15/16" long and 5" wide on all three segments. When it is laid out on a sheet of plywood I center my saw blade on the line since I am using both pieces on either side of the blade.
The rest is pretty easy, 6 pieces 3" x about 42 15/16" (four of them with an 18* bevel cut down one long side) and 4 at 2". Then from the inside of a leg you cut 8 pieces that are used for the inside of the legs for support.
Here is a video helping with the building process. I go into some detail about assembly and remind you of a few things, check it out.
More detailed photo's and descriptions are availiable in this post that should aid in the the building process.
If anyone has and questions of comments feel free. Don't forget about The Woodworking Trip, there should be a video on these things coming soon. Thank you!
Subscribe to:
Posts (Atom)