I had some of my Youtube viewers and subscribers asking about some specifics on my drawer storage unit and the dimensions so I went ahead and made a quick video out of it.

Showing posts with label My Woodworking Shop. Show all posts
Showing posts with label My Woodworking Shop. Show all posts
Saturday, April 14, 2012
Monday, February 13, 2012
Installing a Router Plate in a Router Table
Since I did a video on my Mobile Router Table one of my Youtube subscribers asked me to do a video showing how I cut the hole for the router plate to sit down into. Have look and see how it's done!
The router plate I used is a Kreg Precision Plate and it's probably one of the best router plates out there for the best price, alot of positive reviews on it. Any other router plate would install basically the same way though.
Details on the Leveling Screws-
To install the leveling screws, just drill a hole a little smaller in diameter than the bolt itself and then carefully thread the bolt into the hole. The threads of the bolt should grab onto the wood and hold fairly well, if it goes out of wack it's simple to adjust later. Any size screw will do, I just used some spare ones's I have laying around.
Thanks for visiting and be sure to come back for more!
Saturday, February 11, 2012
Drawer Storage Unit in my Woodworking Shop
I had one of my Youtube subscribers request that I do a video on my drawer storage unit that he spotted in one of my other videos. I was happy to do the video for him and it turned out well and gave me an idea or two for future videos!
This thing is great for storage and I like the small, shallow drawers the best because it seems like it's the small stuff that gets layed down everywhere in the shop where you can't find them when you need it. Well, the small drawers give you a place to put this suff.
Thanks for watching! If you want to see more of my videos CLICK HERE.
Saturday, February 4, 2012
My Mobile Router Table Video
I had one of my Youtube subscribers request that I make a video about my mobile router table that he spotted in my shop tour video. It's a simple video but it gets the basics across for this easy to build router table.
Friday, February 3, 2012
Simple Garage Shelving Unit
I have been working a lot lately trying to straighten up our garage. When I first started there was quite a bit of clutter everywhere, slowly but surely I have been getting things in order and throwing out quite a bit of "trash" that my stepfather had collected over the years. One thing that was posing a problem is that there were not any small, shallow shelves to store spray paint, oils, and other liquids, mostly we have shelves that are about 2' deep which is way to deep and causes you to loose things easily.
I saved some scrap lumber from a remodeling job that I was working on last week figuring it would be perfect for some shelves. I was right, these shelves didn't cost me anything but time and I have enough scrap to make a least 2 more units.
Have a look!
This was an easy project that anyone should be able to pull off in an afternoon or even an hour. Be sure to check out my other videos. If you have any questions, comments or suggestions feel free to let me know.
Saturday, January 28, 2012
DIY Drill Charging Station
{EAV:c37991ac4872e97e}
I finally decided to get busy on my Drill Charging Station, one more woodworking project that would help me organize my shop some more. It came out wonderfully and was actually really easy to do.
Here are the dimensions of the main pieces for those who are interested.
Bottom- 7 ¾” x 19”
Back- 10 ¼” x 19”
Sides- 11” x 7 ¾”
Inside Dividers- 7” x 10 ¼”
Shelf- 6 ½” x 10 ½”
I left about 3 ½” in the slot for the drills to drop down into. The wires just bunch up behind it and stay pretty well since the French cleats put pressure against the wall holding them there.
If anyone has and questions feel free to let me know.
Don’t forget to check out Will Ellis too! http://www.o2thinkbig.co.uk/Projects/Project-Home/?clubId=1739
Monday, January 23, 2012
My French Cleat System
Check out my french cleat system in my woodworking shop. It's a fabulous way to hang things on the wall and the storage options for a small or large shop are endless with this system, use your imagination!
Thanks for watching, click on the"Videos" link on the left side of the page for more!
Sunday, January 15, 2012
My Woodworking Shop Tour
I figured I would do a little shop tour video for everyone! I know I enjoy seeing other people's shops to get ideas and learn what works for them so that maybe I can make my workspace a little better.
I know I really ejoy showing my small woodworking shop to any guests we may have over, I love explaining what each tool does and how and why I built my different jigs, storage systems, and shop furniture things. Maybe my video gave you some inspiration or an idea of a way you can improve your small shop.
If anyone has any questions please feel free to let me know and I will be happy to answer them!
Saturday, December 31, 2011
Simple Drawer Making - A How To Video
I was making some drawers the other day for a couple of vanities when I got the idea to make a video on how I build my easy - simple drawers in my woodworking shop. This method doesn't use and complicated joinery or any specialized tools. If you have every feared making drawers like I once did then try this route and you should be able to take drawers on easily.
Thank you all for watching!
Wednesday, December 29, 2010
DIY Plywood Cutting Table
I completed my video on my Plywood Cutting Table! I think I am getting a little better at making videos too. They are getting more precise and to the point with less rambling and less "uhhh....." "and uh..." in it. Also, I think I ended up with a much better quality picture in the video since I rendered it to different specs.
I hope everyone enjoy's the video and feel free to comment and ask questions if you have one!
I hope everyone enjoy's the video and feel free to comment and ask questions if you have one!
Monday, December 20, 2010
Things to come!
I am happy to say that I have finally figured out a solution to my video camera problems!
It all started when my computer became infected with a virus and my computer needed to go to the shop because it was beyond my capabilities to repair. My mother, as a favor, sent my computer to the shop to have it cleaned up and somehow the message got across to the computer tech's to just wipe my hard drive clean, or at least one of them (my important one). So anyways, I receive my computer back and realize what has happened and that I have lost quite a bit of important files. One of those files being a program called HD Writer which is used to get the videos off of my camera. Well, I try to find the disc with the program on it but failed time and time again to locate it. So time goes on and after much searching all across the internet I find a new program that can do the job, for $34. It was either buy the program or basically toss the camera, I bought it.
The first thing I did was I took the videos I made of the construction of my folding sawhorses and edited them and uploaded them to YouTube and posted it here on my blog, the previous post actually. Hopefully that video will get out to some people who need a nice stable sawhorse that can be stored out of the way easily.
The next thing on my agenda is to get some footage of my "accessories" that I use on top of my sawhorses to make working MUCH easier. The first thing is my miter saw stand.

This thing is great, it gives me something to use with my miter saw that will support longer pieces and gives me a bit of a fence to help hold the stock I am cutting straight. More information on this coming soon in a video!
Then there is my plywood cutting table. Usually, when using sawhorses, I would lay one or two 2x4's across the tops of the horses to act as supports when cutting my plywood. Making this table was pretty simple and cheap, well worth the effort. It is good for more than just ripping plywood too, it's a great work table on the job and in the shop also.

This thing will be featured in a video soon also! Be sure and check back soon, the videos will be here on my blog and also on my YouTube channel.
It all started when my computer became infected with a virus and my computer needed to go to the shop because it was beyond my capabilities to repair. My mother, as a favor, sent my computer to the shop to have it cleaned up and somehow the message got across to the computer tech's to just wipe my hard drive clean, or at least one of them (my important one). So anyways, I receive my computer back and realize what has happened and that I have lost quite a bit of important files. One of those files being a program called HD Writer which is used to get the videos off of my camera. Well, I try to find the disc with the program on it but failed time and time again to locate it. So time goes on and after much searching all across the internet I find a new program that can do the job, for $34. It was either buy the program or basically toss the camera, I bought it.
The first thing I did was I took the videos I made of the construction of my folding sawhorses and edited them and uploaded them to YouTube and posted it here on my blog, the previous post actually. Hopefully that video will get out to some people who need a nice stable sawhorse that can be stored out of the way easily.
The next thing on my agenda is to get some footage of my "accessories" that I use on top of my sawhorses to make working MUCH easier. The first thing is my miter saw stand.
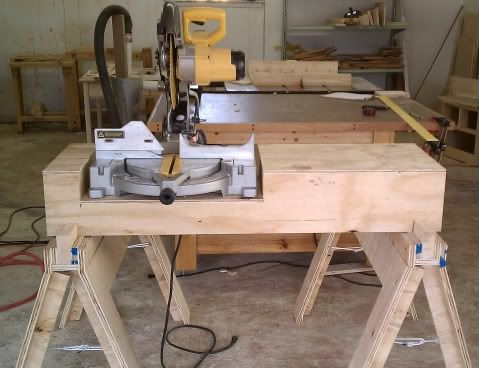
This thing is great, it gives me something to use with my miter saw that will support longer pieces and gives me a bit of a fence to help hold the stock I am cutting straight. More information on this coming soon in a video!
Then there is my plywood cutting table. Usually, when using sawhorses, I would lay one or two 2x4's across the tops of the horses to act as supports when cutting my plywood. Making this table was pretty simple and cheap, well worth the effort. It is good for more than just ripping plywood too, it's a great work table on the job and in the shop also.
This thing will be featured in a video soon also! Be sure and check back soon, the videos will be here on my blog and also on my YouTube channel.
Friday, July 9, 2010
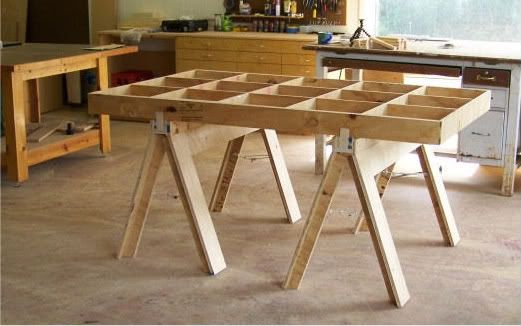
DIY Folding Sawhorses - Version 2.0 with Free Plans
I am calling this free plans, I have the cutout photo of a sheet of plywood with the dimensions on it. The rest pretty straight forward I believe. But, while I was building this set I was video taping a how to video and hopefully that will be up and running online soon which should make everything very simple.
The original sawhorse design was a great one, the only things I really changed for the 2.0 version were the height of the horses, the width of the horses, and the width of the leg panels. The changes made now allow for nearly, if not all of the materials to be cut out of one sheet of plywood (on the computer it says it can be done, but when I tried I failed somehow). The working height could be lowered still to enable you to get everything out of one piece except for the 2x4 top piece, but that would lower the working height to a level to low for my personal preference.
The working height in version 2.0 is approximately 31" which uses a leg panel height of 28", and the width of the sawhorses are nearly 43". The width of a leg panels is 5" which allows you to cut two leg panels out of a 48"x33" section of 3/4" plywood. It may be difficult to understand but I will have a image of the cut list soon which will help clear everything up.
Everything else is the same as the original version.

I built a set of these about three of four weeks ago and have been using them on remodeling and construction jobs and they are holding up great. I have had easily over 100 8' pieces of tongue and groove pine on them along with a miter saw and they never showed any signs of weakness. Everyone who comes to the jobs takes a close look at the sawhorses and asks my boss man where he got them, it feels good when he points at me and says "He built them, not me".
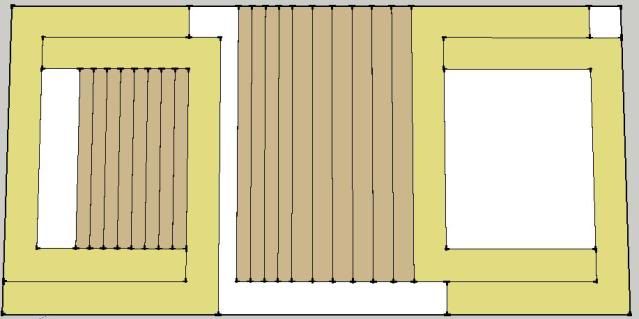
The construction is pretty simple and I think you should be able to simply recreate your own. I did however make a cut list type thing on Sketch up that shows how you can get the pieces easily out of one sheet of plywood.

The "U" shaped leg panels are 28" tall and about 42 15/16" long and 5" wide on all three segments. When it is laid out on a sheet of plywood I center my saw blade on the line since I am using both pieces on either side of the blade.
The rest is pretty easy, 6 pieces 3" x about 42 15/16" (four of them with an 18* bevel cut down one long side) and 4 at 2". Then from the inside of a leg you cut 8 pieces that are used for the inside of the legs for support.
Here is a video helping with the building process. I go into some detail about assembly and remind you of a few things, check it out.
More detailed photo's and descriptions are availiable in this post that should aid in the the building process.
If anyone has and questions of comments feel free. Don't forget about The Woodworking Trip, there should be a video on these things coming soon. Thank you!
The original sawhorse design was a great one, the only things I really changed for the 2.0 version were the height of the horses, the width of the horses, and the width of the leg panels. The changes made now allow for nearly, if not all of the materials to be cut out of one sheet of plywood (on the computer it says it can be done, but when I tried I failed somehow). The working height could be lowered still to enable you to get everything out of one piece except for the 2x4 top piece, but that would lower the working height to a level to low for my personal preference.
The working height in version 2.0 is approximately 31" which uses a leg panel height of 28", and the width of the sawhorses are nearly 43". The width of a leg panels is 5" which allows you to cut two leg panels out of a 48"x33" section of 3/4" plywood. It may be difficult to understand but I will have a image of the cut list soon which will help clear everything up.
Everything else is the same as the original version.
I built a set of these about three of four weeks ago and have been using them on remodeling and construction jobs and they are holding up great. I have had easily over 100 8' pieces of tongue and groove pine on them along with a miter saw and they never showed any signs of weakness. Everyone who comes to the jobs takes a close look at the sawhorses and asks my boss man where he got them, it feels good when he points at me and says "He built them, not me".
The construction is pretty simple and I think you should be able to simply recreate your own. I did however make a cut list type thing on Sketch up that shows how you can get the pieces easily out of one sheet of plywood.
The "U" shaped leg panels are 28" tall and about 42 15/16" long and 5" wide on all three segments. When it is laid out on a sheet of plywood I center my saw blade on the line since I am using both pieces on either side of the blade.
The rest is pretty easy, 6 pieces 3" x about 42 15/16" (four of them with an 18* bevel cut down one long side) and 4 at 2". Then from the inside of a leg you cut 8 pieces that are used for the inside of the legs for support.
Here is a video helping with the building process. I go into some detail about assembly and remind you of a few things, check it out.
More detailed photo's and descriptions are availiable in this post that should aid in the the building process.
If anyone has and questions of comments feel free. Don't forget about The Woodworking Trip, there should be a video on these things coming soon. Thank you!
Thursday, June 3, 2010
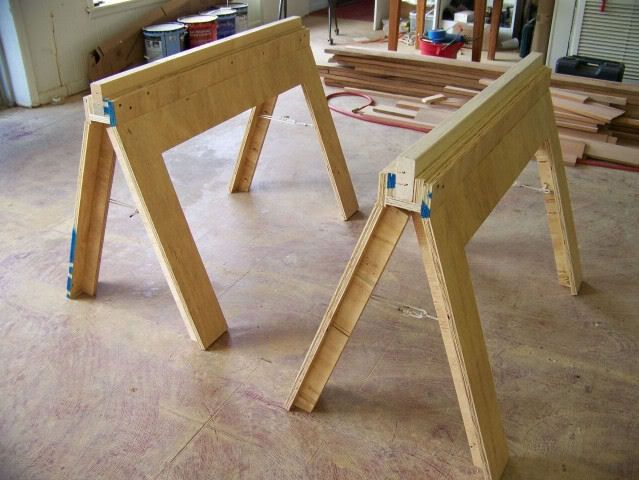
DIY Folding Sawhorses- First Design
Sawhorses, every shop needs them, everyone probably needs another set. I know I do but I wanted something different, something that was easy to store, not to heavy, very sturdy, and all one piece. I have been wanting a set like these for a while and I have looked on the internet for different plans and different designs but I could never find anything I really liked.
(The following is a little story leading up to these sawhorses, feel free to skip down a bit)
Here recently I was working with my cousin who owns a construction company and he has an enclosed trailer that he hauls his tools around in. He also just recently had to let an employee of 6 years go due partly to the economy and partly to performance. One thing about the past employee is keeping things neat and organized (or so my cousin claims, but he doesn't have much room to talk). Anyways, the enclosed trailer is about a 14x8 I would guess and is full of tools, nails, hoses, chords and a bunch of other stuff that has no business being in there or either needs to be thrown out. One thing is a set crappy saw horses that are beyond their prime and are just thrown in on top of everything else. This situation got me thinking I need to give him a set of folding saw horses.
So with the sawhorses on my mind I was watching a video of a fellow woodworker's on Lumberjocks, where he was building a computer table out of plywood which somehow made a light bulb go on in my head.
The problem with alot of lightweight sawhorses is that they wobble, I hate when they wobble. So I thought I could make the legs on each side out of one piece of plywood that way they would not wobble. Then I got on Google Sketchup and came up with these versatile folding sawhorses.

Click on any image to make it larger.
I have only built the one so far but it's great. It took some time to work a few kinks out but here they are. They aren't very heavy and you could easily carry two at one time, I think the leg frames could be made a bit narrower without any problem which would make them even lighter.
One thing I wanted which I have seen on a few other horses is a replaceable top board because they get cut up so easily after a while. You can also have different boards for different applications like a large clamping surface or a panel cutting jig.


They fold up nicely and are only about 4" wide. All you have to do is lift them up and they close right up, no block or pin to remove. They set up easily, just set them on the ground and ease out one leg and that's it.


They aren't very complicated, just some plywood, hinges, and some rope.


I hope other people like them as much as I do. If people find it difficult to copy them then I would be happy to redraw them up in Sketchup or even make a video on them. So let me know what you think, feel free to comment!
Thursday, August 13, 2009
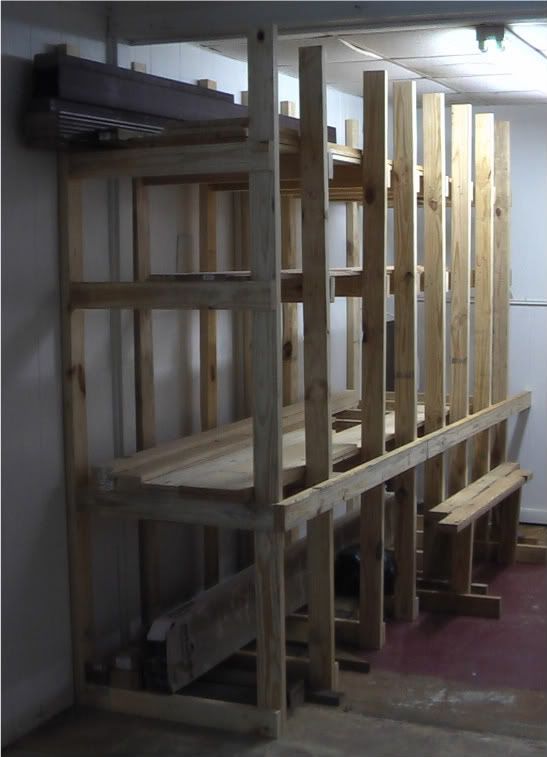
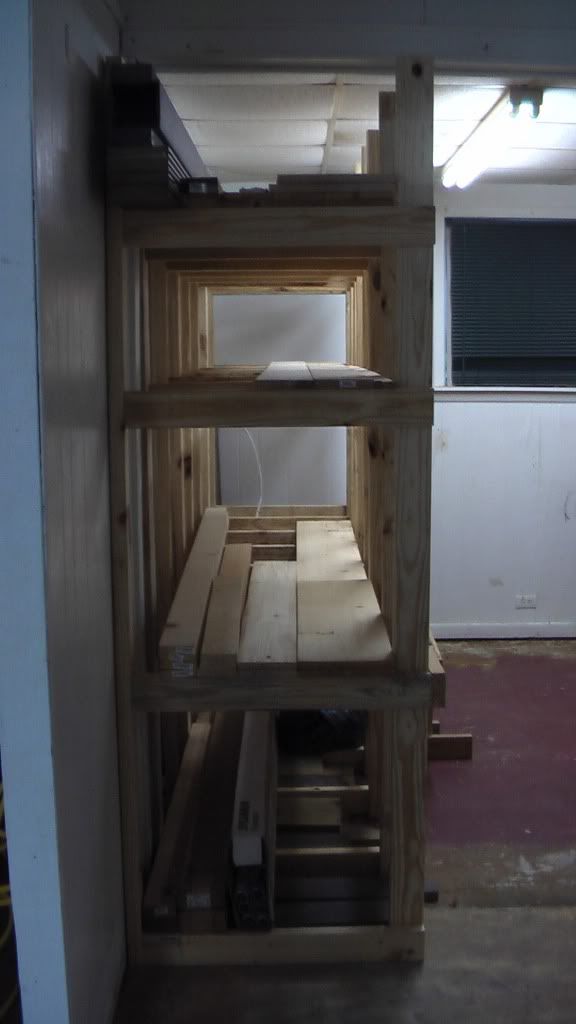
Simple Lumber Rack Plans
I finally built myself a simple but effective lumber rack system. I built it entirely out of 2x4's and it took me probably three hours to complete, not to bad by myself. It is large enough to store 12' long boards, and plenty of them!

The way it is designed, the lumber is supposed to be slid in and out on end. This works perfect in my shop because it is shaped like a "L". The lumber rack is right on the top of the bottom, flat part of the "L". It was definitely the best spot for my lumber rack and I will go into more detail of why in a later post.

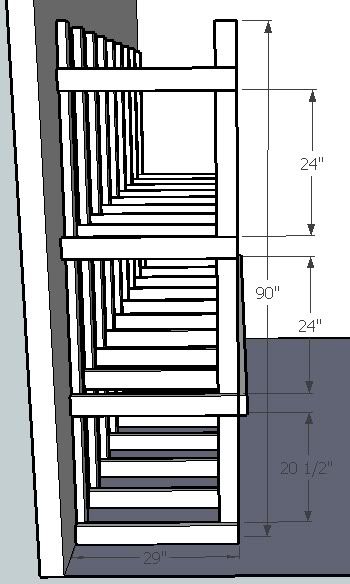
I have drawn a little set of plans on sketchup that better shows how it was put together. I built each unit with pine 2x4's and I nailed them together on the floor with a pneumatic nail gun using some old ring shank nails that I had laying around. You can use screws if you want to take the time but I think the ring shank nails will hold just about as good as a screw would. I spaced the units 16" apart to provide plenty of supports for my lumber to lay flat on and not bow. When you space them 16" apart this lets you nail each on into a stud in the wall which is needed to hold them up. I put one board down the outside of every unit to hold them all together, also it is a just the right height for a small counter top down that side. (I plan on covering the lumber rack and using the rest of the area as a finishing room and the shelf will give me somewhere to set finishing supplies.)

This was a great addition to my shop and really helped me get organized!
The way it is designed, the lumber is supposed to be slid in and out on end. This works perfect in my shop because it is shaped like a "L". The lumber rack is right on the top of the bottom, flat part of the "L". It was definitely the best spot for my lumber rack and I will go into more detail of why in a later post.
I have drawn a little set of plans on sketchup that better shows how it was put together. I built each unit with pine 2x4's and I nailed them together on the floor with a pneumatic nail gun using some old ring shank nails that I had laying around. You can use screws if you want to take the time but I think the ring shank nails will hold just about as good as a screw would. I spaced the units 16" apart to provide plenty of supports for my lumber to lay flat on and not bow. When you space them 16" apart this lets you nail each on into a stud in the wall which is needed to hold them up. I put one board down the outside of every unit to hold them all together, also it is a just the right height for a small counter top down that side. (I plan on covering the lumber rack and using the rest of the area as a finishing room and the shelf will give me somewhere to set finishing supplies.)
This was a great addition to my shop and really helped me get organized!
Wednesday, August 5, 2009
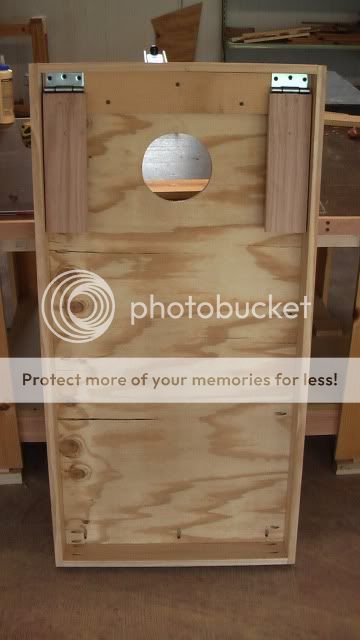
Homemade Cornhole Boards
Just today, I finished building my third set of cornhole boards. The first two sets that I built were for myself and the third set is for a freind who is also addicted to cornhole on Friday and Saturday nights.

The boards are made of 5/8" plwood trimmed in 3/4" select pine grade boards with 3/4" oak legs. I used pockethole-joinery to join the pine to the plywood and screws to attach the hinges and the legs. Glue was used on all joints.
The first two sets of cornhole boards I made where not as good of quality as these boards are. I used 3/4" plywood and 3/4" pine for the first set but I didn't join the pine to the plywood flush with the top like I did with these boards, that should make the edges of the board more durable and it looks great also. Also I just screwed the top down into the pine framing leaving the screws exposed in the top of the boards. On my first set I used a simular hinge setup for the legs which never gave me any trouble.
On the second set I build I used some scrap pine 1x12's that I had laying around and I biscuited them together since I had just purchased my first biscuit jointer. This worked fine but I was learning the biscuits and my joints weren't perfectly flush. For the legs I bolted through the 1x4 pine framing, that again wasn't mounted flush with the top of the board, and into the legs that pivoted on the bolt. This method was agrivating because you would have to tighten the wingnut on the legs very tight to make them stay put during gameplay (even then they would close up little by little with each through of a cornhole bag.
So I think I finally did it right this time joining the pine framing flush with the top of the plywood board and hiding all my joinery with pockethole screws. Using oak for the legs should be an improvement also. I really like the hinges and they are good heavy duty ones too. The legs don't slowly fold in on you like the bolted legs because the angle at which they sit is close to 45 degrees.


These are some great boards, I will have to build a set like these for myself! I think I will take photos or maybe video the building process to post on the internet too.
Thursday, July 23, 2009
Had a Break-In
This past Tuesday when I arrived at my shop I realized it had been broken into in the night. The burglar broke a set of aluminum double doors on the side of my shop and stole about $600 worth of tools out of my shop.
They stole
-Senco Framing Nailer
-Senco Brad Nailer
-Bostitch Roofing Gun
-Dewalt RO Sander
-Dewalt 14.4v Cordless Drill
-Case of Kreg Pockethole Screws
-Face mask Respirator
I was so disapointed when I realized what was stolen. I hadn't gotten my insurance finalized yet so none of the items stolen where re-inbursed. Not much I can do about it now except hope that the police find my tools or that I find them in a local pawn shop. Now I am getting insurance as soon as I can!
Monday, July 20, 2009
Got some deals on some woodworking supplies!
Firday, my mother and I decided to go to a local salvage house to do some bargain shopping. The place we went to is a large freight companies "scratch and dent" store (AAA Cooper). While there was plenty of interesting things in there I only saw two things that I might could use in my shop.
One was a large roll of heavy duty paper that would be perfect to go on the side of my workbench so that I could stretch a sheet of paper across it when I want to paint or finish something, or just draw something really big. It was only $5 so I picked up a roll that should last a long time. I also grabbed a box of 100 latex gloves for one or two dollars that would come in handy some time or another.
When we were leaving the salvage house I recieved a call from a friend that was at an estate sale where there were alot of woodworking tools for cheap. I decided to ride over and I found some good tools for a good value.

-2 24" clamps $3 each
-2 2 1/2" C clamps $.50 each
-1 heavy duty square $2
I knew I could definately use some more clamps and every square that I have is a little bit out of square, even brand new ones! This one tested to be right on the money. I think from now on I will test every square before I buy it in the store.
Workbench / Outfeed table is looking good.
I finally took some pictures of the table today after I finished putting the trim around the edges. It really looks good and I am proud of it. It's a great work surface and is very study and stable.


I trimmed the top edge with some Douglas Fir 1x that was ripped down to the width of the table top. I fastened it with some odinary drywall screws and wood glue, countersinking every screw so that I can come back and put some dowels in the holes to clean it up a bit. Be sure not to over tighten the screws when your attaching these and I put on plenty of glue expecting the MDF to soak it right up.
I still plan on putting a vice on the right end of the table and I am going to have to order some leveling legs for it because what I had planned for legs just didn't work out (some threaded shafts and a couple nuts).
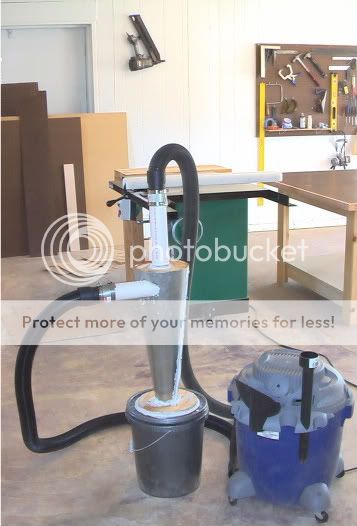
Homemade Vacuum Cyclone Test
I completed the dust cyclone for my shop vacuum. To finish up, all I needed to do was to secure the pipe through the plywood on the top of the funnel. I did this with some rubber strips, zip-ties, and caulking. It may have been the bost choice so I may go back and do it with some 1 min epoxy (I like that stuff!).
Then I glued the plywood into the top of the funnel with a small rubber strip around the plywood to tighten the fit and to help seal it. Then I just used some normal wood glue to hold it in place. We will see how this holds, epoxy would have worked well here also.
Then I simply put the two couplings on each pipe and attached my shop vac hose and I was done!

Overall, the system really worked great. The only problem was that the 5 gallon bucket wasn't strong enough and would try to collapse if I covered the open end of the hose completely. The bucket I have is thinner than normal buckets so i'll just have to get a thicker one then I should be fine I hope.
It really amazed me at how clean the filter and shop vac can was. I sucked up a pretty good bit of saw dust and smaller particles that I swept up off the floor, all in all about 1/3 of a 5 gallon bucket. The shop vac was empty except for a few long shavings some other larger pieces of trash that I was curious about. The filter looked good and clean so this thing really made a big improvment, glad I built it. You should really consider building one too!
Then I glued the plywood into the top of the funnel with a small rubber strip around the plywood to tighten the fit and to help seal it. Then I just used some normal wood glue to hold it in place. We will see how this holds, epoxy would have worked well here also.
Then I simply put the two couplings on each pipe and attached my shop vac hose and I was done!
Overall, the system really worked great. The only problem was that the 5 gallon bucket wasn't strong enough and would try to collapse if I covered the open end of the hose completely. The bucket I have is thinner than normal buckets so i'll just have to get a thicker one then I should be fine I hope.
It really amazed me at how clean the filter and shop vac can was. I sucked up a pretty good bit of saw dust and smaller particles that I swept up off the floor, all in all about 1/3 of a 5 gallon bucket. The shop vac was empty except for a few long shavings some other larger pieces of trash that I was curious about. The filter looked good and clean so this thing really made a big improvment, glad I built it. You should really consider building one too!
Friday, July 17, 2009
Not a very productive day....
Went to the shop this morning and checked on my cyclone. The caulking wasn't are hard as I was hoping it would be. It was still pretty soft to the touch and I am afraid that it may just suck into the seams when the vacuum is turned on. Maybe it just didn't cure enough, so I am going to let it sit for the weekend and check it on Monday.
Today I did work on my workbench a little more though. All I really had left to do was to put the trim around the edges of the table top. I went to Lowe's and bought some 1x3 Douglas Fir and ripped it down to 1 5/8" which is the thickness of the table top. Then I cut the pieces to fit on miters and began countersinking/drilling then glueing and screwing them on.
I had a pretty busy day and I wasn't able to spend as much time in the shop as I had hoped. We will see how next week goes, maybe I will start on some of the cabinets for the shop!
Subscribe to:
Posts (Atom)