I made a video on the method I used, maybe you could use it too!

Showing posts with label Videos. Show all posts
Showing posts with label Videos. Show all posts
Thursday, August 9, 2012
Easy Door Frame Rot Repair
My future father-in-law's back door was starting to rot at the bottom and he asked me about it. He said he wanted to know if he needed a whole new door. I told him I could just patch it up with some epoxy putty and he looked at me a little funny. Once the job was done, he was pleasantly surprised at how good it looked and he was surely glad he didn't have to buy a new door.
I made a video on the method I used, maybe you could use it too!
I made a video on the method I used, maybe you could use it too!
Thursday, July 26, 2012
Drawer Dividers DIY - Simple
I have used these drawer dividers in my shop for a while now and they work great. Thought I would share them in a video!
Saturday, April 14, 2012
Video on my Drawer Storage Unit Frame
I had some of my Youtube viewers and subscribers asking about some specifics on my drawer storage unit and the dimensions so I went ahead and made a quick video out of it.
Monday, February 13, 2012
Installing a Router Plate in a Router Table
Since I did a video on my Mobile Router Table one of my Youtube subscribers asked me to do a video showing how I cut the hole for the router plate to sit down into. Have look and see how it's done!
The router plate I used is a Kreg Precision Plate and it's probably one of the best router plates out there for the best price, alot of positive reviews on it. Any other router plate would install basically the same way though.
Details on the Leveling Screws-
To install the leveling screws, just drill a hole a little smaller in diameter than the bolt itself and then carefully thread the bolt into the hole. The threads of the bolt should grab onto the wood and hold fairly well, if it goes out of wack it's simple to adjust later. Any size screw will do, I just used some spare ones's I have laying around.
Thanks for visiting and be sure to come back for more!
Saturday, February 11, 2012
Drawer Storage Unit in my Woodworking Shop
I had one of my Youtube subscribers request that I do a video on my drawer storage unit that he spotted in one of my other videos. I was happy to do the video for him and it turned out well and gave me an idea or two for future videos!
This thing is great for storage and I like the small, shallow drawers the best because it seems like it's the small stuff that gets layed down everywhere in the shop where you can't find them when you need it. Well, the small drawers give you a place to put this suff.
Thanks for watching! If you want to see more of my videos CLICK HERE.
Saturday, February 4, 2012
My Mobile Router Table Video
I had one of my Youtube subscribers request that I make a video about my mobile router table that he spotted in my shop tour video. It's a simple video but it gets the basics across for this easy to build router table.
Friday, February 3, 2012
Simple Garage Shelving Unit
I have been working a lot lately trying to straighten up our garage. When I first started there was quite a bit of clutter everywhere, slowly but surely I have been getting things in order and throwing out quite a bit of "trash" that my stepfather had collected over the years. One thing that was posing a problem is that there were not any small, shallow shelves to store spray paint, oils, and other liquids, mostly we have shelves that are about 2' deep which is way to deep and causes you to loose things easily.
I saved some scrap lumber from a remodeling job that I was working on last week figuring it would be perfect for some shelves. I was right, these shelves didn't cost me anything but time and I have enough scrap to make a least 2 more units.
Have a look!
This was an easy project that anyone should be able to pull off in an afternoon or even an hour. Be sure to check out my other videos. If you have any questions, comments or suggestions feel free to let me know.
Saturday, January 28, 2012
DIY Drill Charging Station
{EAV:c37991ac4872e97e}
I finally decided to get busy on my Drill Charging Station, one more woodworking project that would help me organize my shop some more. It came out wonderfully and was actually really easy to do.
Here are the dimensions of the main pieces for those who are interested.
Bottom- 7 ¾” x 19”
Back- 10 ¼” x 19”
Sides- 11” x 7 ¾”
Inside Dividers- 7” x 10 ¼”
Shelf- 6 ½” x 10 ½”
I left about 3 ½” in the slot for the drills to drop down into. The wires just bunch up behind it and stay pretty well since the French cleats put pressure against the wall holding them there.
If anyone has and questions feel free to let me know.
Don’t forget to check out Will Ellis too! http://www.o2thinkbig.co.uk/Projects/Project-Home/?clubId=1739
Monday, January 23, 2012
My French Cleat System
Check out my french cleat system in my woodworking shop. It's a fabulous way to hang things on the wall and the storage options for a small or large shop are endless with this system, use your imagination!
Thanks for watching, click on the"Videos" link on the left side of the page for more!
Sunday, January 15, 2012
My Woodworking Shop Tour
I figured I would do a little shop tour video for everyone! I know I enjoy seeing other people's shops to get ideas and learn what works for them so that maybe I can make my workspace a little better.
I know I really ejoy showing my small woodworking shop to any guests we may have over, I love explaining what each tool does and how and why I built my different jigs, storage systems, and shop furniture things. Maybe my video gave you some inspiration or an idea of a way you can improve your small shop.
If anyone has any questions please feel free to let me know and I will be happy to answer them!
Saturday, December 31, 2011
Simple Drawer Making - A How To Video
I was making some drawers the other day for a couple of vanities when I got the idea to make a video on how I build my easy - simple drawers in my woodworking shop. This method doesn't use and complicated joinery or any specialized tools. If you have every feared making drawers like I once did then try this route and you should be able to take drawers on easily.
Thank you all for watching!
Wednesday, February 9, 2011
Tool Review - Hitachi 2" Brad Nailer
Here is a quick review of my Hitachi 2" Brad Nailer, NT 50AE2. Figured I would try a tool review video and see how it turned out, overall I think it went pretty well.
If anyone has spotted any other tools in my videos that they would like to see a review done on just let me know, I'd be happy to do another.
If anyone has spotted any other tools in my videos that they would like to see a review done on just let me know, I'd be happy to do another.
Monday, February 7, 2011
How to build a Lumber Rack Video- Better than free plans!
I definately needed a lumber rack in my new small shop so I got to looking around the internet at other people's ideas and builds and most of them seemed pretty complicated or they protruded out from the wall to much for my small shop.
I came up with a simple but strong design that doesn't force you to sacrifice space nor does it take alot of tools, materials, or complicated jointery to build. In my small shop I am trying to put alot of things on wheels and this lumber rack is not built all the way to the floor so that I can roll tools underneathe it.
So take some time to watch this video and build yourself a great lumber rack.
I do consider this a meduim duty lumber rack but you could easily add two more uprights with supports between these making them 16" on center rather than my 32" on center. This would add alot of extra strength is you decided to load it up excessively.
Monday, January 3, 2011
How to build Cornhole Boards- A video Tutorial
Here is my video on how to make a nice set of cornhole boards. Everything is up to the tournament standards and these thing look nice. Not just some plywood and 2x4's.
Anyone can build these with just a few simple tools.
The pocket hole screws were my preferred method although you could simply screw from the outside of the 1x4 into the plywood deck, predrilling and glueing would be recommended. Nails would probably work in place of screws but I would be sure and put plenty of both nails and glue.
I hope you all enjoy!
Wednesday, December 29, 2010
DIY Plywood Cutting Table
I completed my video on my Plywood Cutting Table! I think I am getting a little better at making videos too. They are getting more precise and to the point with less rambling and less "uhhh....." "and uh..." in it. Also, I think I ended up with a much better quality picture in the video since I rendered it to different specs.
I hope everyone enjoy's the video and feel free to comment and ask questions if you have one!
I hope everyone enjoy's the video and feel free to comment and ask questions if you have one!
Friday, July 9, 2010
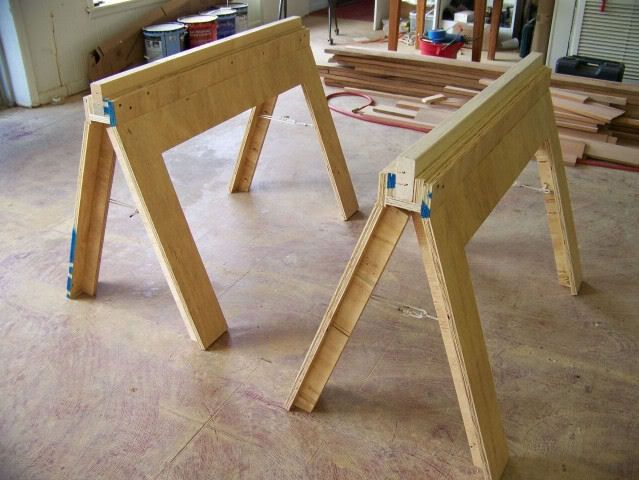
DIY Folding Sawhorses - Version 2.0 with Free Plans
I am calling this free plans, I have the cutout photo of a sheet of plywood with the dimensions on it. The rest pretty straight forward I believe. But, while I was building this set I was video taping a how to video and hopefully that will be up and running online soon which should make everything very simple.
The original sawhorse design was a great one, the only things I really changed for the 2.0 version were the height of the horses, the width of the horses, and the width of the leg panels. The changes made now allow for nearly, if not all of the materials to be cut out of one sheet of plywood (on the computer it says it can be done, but when I tried I failed somehow). The working height could be lowered still to enable you to get everything out of one piece except for the 2x4 top piece, but that would lower the working height to a level to low for my personal preference.
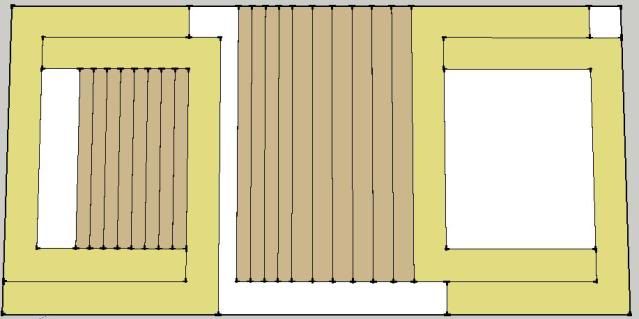
The working height in version 2.0 is approximately 31" which uses a leg panel height of 28", and the width of the sawhorses are nearly 43". The width of a leg panels is 5" which allows you to cut two leg panels out of a 48"x33" section of 3/4" plywood. It may be difficult to understand but I will have a image of the cut list soon which will help clear everything up.
Everything else is the same as the original version.

I built a set of these about three of four weeks ago and have been using them on remodeling and construction jobs and they are holding up great. I have had easily over 100 8' pieces of tongue and groove pine on them along with a miter saw and they never showed any signs of weakness. Everyone who comes to the jobs takes a close look at the sawhorses and asks my boss man where he got them, it feels good when he points at me and says "He built them, not me".
The construction is pretty simple and I think you should be able to simply recreate your own. I did however make a cut list type thing on Sketch up that shows how you can get the pieces easily out of one sheet of plywood.

The "U" shaped leg panels are 28" tall and about 42 15/16" long and 5" wide on all three segments. When it is laid out on a sheet of plywood I center my saw blade on the line since I am using both pieces on either side of the blade.
The rest is pretty easy, 6 pieces 3" x about 42 15/16" (four of them with an 18* bevel cut down one long side) and 4 at 2". Then from the inside of a leg you cut 8 pieces that are used for the inside of the legs for support.
Here is a video helping with the building process. I go into some detail about assembly and remind you of a few things, check it out.
More detailed photo's and descriptions are availiable in this post that should aid in the the building process.
If anyone has and questions of comments feel free. Don't forget about The Woodworking Trip, there should be a video on these things coming soon. Thank you!
The original sawhorse design was a great one, the only things I really changed for the 2.0 version were the height of the horses, the width of the horses, and the width of the leg panels. The changes made now allow for nearly, if not all of the materials to be cut out of one sheet of plywood (on the computer it says it can be done, but when I tried I failed somehow). The working height could be lowered still to enable you to get everything out of one piece except for the 2x4 top piece, but that would lower the working height to a level to low for my personal preference.
The working height in version 2.0 is approximately 31" which uses a leg panel height of 28", and the width of the sawhorses are nearly 43". The width of a leg panels is 5" which allows you to cut two leg panels out of a 48"x33" section of 3/4" plywood. It may be difficult to understand but I will have a image of the cut list soon which will help clear everything up.
Everything else is the same as the original version.
I built a set of these about three of four weeks ago and have been using them on remodeling and construction jobs and they are holding up great. I have had easily over 100 8' pieces of tongue and groove pine on them along with a miter saw and they never showed any signs of weakness. Everyone who comes to the jobs takes a close look at the sawhorses and asks my boss man where he got them, it feels good when he points at me and says "He built them, not me".
The construction is pretty simple and I think you should be able to simply recreate your own. I did however make a cut list type thing on Sketch up that shows how you can get the pieces easily out of one sheet of plywood.
The "U" shaped leg panels are 28" tall and about 42 15/16" long and 5" wide on all three segments. When it is laid out on a sheet of plywood I center my saw blade on the line since I am using both pieces on either side of the blade.
The rest is pretty easy, 6 pieces 3" x about 42 15/16" (four of them with an 18* bevel cut down one long side) and 4 at 2". Then from the inside of a leg you cut 8 pieces that are used for the inside of the legs for support.
Here is a video helping with the building process. I go into some detail about assembly and remind you of a few things, check it out.
More detailed photo's and descriptions are availiable in this post that should aid in the the building process.
If anyone has and questions of comments feel free. Don't forget about The Woodworking Trip, there should be a video on these things coming soon. Thank you!
Subscribe to:
Posts (Atom)