Browsing the LumberJocks forum, I have found that Hitachi sells reconditioned tools for pretty good deals compared to buying brand new. Reconditioned tools are pretty much new tools, they are tools that have been returned by customers to the retailer. They are all tools that could have had defects, been returned by an unsatisfied customer, returned after a weekend project, some returned brand new just because. When a tools is returned to a retailer, they cannot just put it back on the shelf, instead they have return it to the company. When this happens the company, in my case Hitachi, fixes whatever was wrong with the tools and sells them at discounted prices.
I think this is a great way to buy like new tools for great prices. The tools come with the full factory warranty.
I ordered two tools from Hitachi, both of which have great reviews on different websites like Amazon and LumberJocks. I bought the Hitachi DS18DFL 18V 1.5Ah Lithium Ion Driver Drill for $109 and the Hitachi NT50AE2 2" 18-Gauge Brad Nailer for $53 since both of mine where stolen.
Seems like a good deal to me, we will see once the tools get here!

Thursday, July 23, 2009
Had a Break-In
This past Tuesday when I arrived at my shop I realized it had been broken into in the night. The burglar broke a set of aluminum double doors on the side of my shop and stole about $600 worth of tools out of my shop.
They stole
-Senco Framing Nailer
-Senco Brad Nailer
-Bostitch Roofing Gun
-Dewalt RO Sander
-Dewalt 14.4v Cordless Drill
-Case of Kreg Pockethole Screws
-Face mask Respirator
I was so disapointed when I realized what was stolen. I hadn't gotten my insurance finalized yet so none of the items stolen where re-inbursed. Not much I can do about it now except hope that the police find my tools or that I find them in a local pawn shop. Now I am getting insurance as soon as I can!
Poplar Offereing Table
There is a small church next door to my shop and the pastor asked me if I could make them a simple offering table with a couple of drawers in it. I said sure! My first paying job, although it didn't really pay anything just materials since I am pretty new at this stuff.
Anyways, here is how it turned out, this is the first time I have ever really built drawers into a piece and I think they came out great. They are just on some wooden slides that I fabricated since the chuch didn't want to spend much money at all.


The poplar was great to work with and so is my kreg pockethole jig system. It was used to joint pretty much every piece on this table, although you would never know just looking at the table normally.
Tuesday, July 21, 2009
Beer Pong Table
Alot of my Friends enjoy the occasional game of beer pong. It's basically a game played with Solo cups, Ping Pong balls and beer. You put beer in the cups and put them in a pyramid shape on either side of an eight foot table. Then two teams alternate turn throwing a ping pong ball into the opponents cups of beers and any cups they miss the other team has to drink them. The game keeps going until one team has run out of cups and they loose and have to drink whatever beer is left in the winner's cups.
Anyways, people always seem to be using a flimsy folding table that is either to short, to soft (the balls can't bounce for a special shot), or just not ideal for the game. So my buddy wanted a table made just for beer pong and that is just what I built him.

The table is eight foot long and two foot wide. This one is built with select grade pine to be both affordable but good looking. The entire table was coated with polyurethane with about 6 coats on the top of the table and probably four everywhere else except underneath the table top where there is only one coat. It works great and the balls bounce pretty good on it too. It only cost about $150 to build counting lumber, poly, pocket hole screws, etc.
Monday, July 20, 2009
Got some deals on some woodworking supplies!
Firday, my mother and I decided to go to a local salvage house to do some bargain shopping. The place we went to is a large freight companies "scratch and dent" store (AAA Cooper). While there was plenty of interesting things in there I only saw two things that I might could use in my shop.
One was a large roll of heavy duty paper that would be perfect to go on the side of my workbench so that I could stretch a sheet of paper across it when I want to paint or finish something, or just draw something really big. It was only $5 so I picked up a roll that should last a long time. I also grabbed a box of 100 latex gloves for one or two dollars that would come in handy some time or another.
When we were leaving the salvage house I recieved a call from a friend that was at an estate sale where there were alot of woodworking tools for cheap. I decided to ride over and I found some good tools for a good value.

-2 24" clamps $3 each
-2 2 1/2" C clamps $.50 each
-1 heavy duty square $2
I knew I could definately use some more clamps and every square that I have is a little bit out of square, even brand new ones! This one tested to be right on the money. I think from now on I will test every square before I buy it in the store.
Workbench / Outfeed table is looking good.
I finally took some pictures of the table today after I finished putting the trim around the edges. It really looks good and I am proud of it. It's a great work surface and is very study and stable.


I trimmed the top edge with some Douglas Fir 1x that was ripped down to the width of the table top. I fastened it with some odinary drywall screws and wood glue, countersinking every screw so that I can come back and put some dowels in the holes to clean it up a bit. Be sure not to over tighten the screws when your attaching these and I put on plenty of glue expecting the MDF to soak it right up.
I still plan on putting a vice on the right end of the table and I am going to have to order some leveling legs for it because what I had planned for legs just didn't work out (some threaded shafts and a couple nuts).
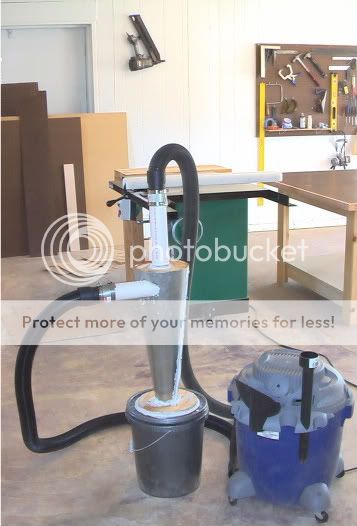
Homemade Vacuum Cyclone Test
I completed the dust cyclone for my shop vacuum. To finish up, all I needed to do was to secure the pipe through the plywood on the top of the funnel. I did this with some rubber strips, zip-ties, and caulking. It may have been the bost choice so I may go back and do it with some 1 min epoxy (I like that stuff!).
Then I glued the plywood into the top of the funnel with a small rubber strip around the plywood to tighten the fit and to help seal it. Then I just used some normal wood glue to hold it in place. We will see how this holds, epoxy would have worked well here also.
Then I simply put the two couplings on each pipe and attached my shop vac hose and I was done!

Overall, the system really worked great. The only problem was that the 5 gallon bucket wasn't strong enough and would try to collapse if I covered the open end of the hose completely. The bucket I have is thinner than normal buckets so i'll just have to get a thicker one then I should be fine I hope.
It really amazed me at how clean the filter and shop vac can was. I sucked up a pretty good bit of saw dust and smaller particles that I swept up off the floor, all in all about 1/3 of a 5 gallon bucket. The shop vac was empty except for a few long shavings some other larger pieces of trash that I was curious about. The filter looked good and clean so this thing really made a big improvment, glad I built it. You should really consider building one too!
Then I glued the plywood into the top of the funnel with a small rubber strip around the plywood to tighten the fit and to help seal it. Then I just used some normal wood glue to hold it in place. We will see how this holds, epoxy would have worked well here also.
Then I simply put the two couplings on each pipe and attached my shop vac hose and I was done!
Overall, the system really worked great. The only problem was that the 5 gallon bucket wasn't strong enough and would try to collapse if I covered the open end of the hose completely. The bucket I have is thinner than normal buckets so i'll just have to get a thicker one then I should be fine I hope.
It really amazed me at how clean the filter and shop vac can was. I sucked up a pretty good bit of saw dust and smaller particles that I swept up off the floor, all in all about 1/3 of a 5 gallon bucket. The shop vac was empty except for a few long shavings some other larger pieces of trash that I was curious about. The filter looked good and clean so this thing really made a big improvment, glad I built it. You should really consider building one too!
Subscribe to:
Comments (Atom)