Thursday, June 3, 2010

DIY Folding Sawhorses- First Design

Sawhorses, every shop needs them, everyone probably needs another set. I know I do but I wanted something different, something that was easy to store, not to heavy, very sturdy, and all one piece. I have been wanting a set like these for a while and I have looked on the internet for different plans and different designs but I could never find anything I really liked.

(The following is a little story leading up to these sawhorses, feel free to skip down a bit)
Here recently I was working with my cousin who owns a construction company and he has an enclosed trailer that he hauls his tools around in. He also just recently had to let an employee of 6 years go due partly to the economy and partly to performance. One thing about the past employee is keeping things neat and organized (or so my cousin claims, but he doesn't have much room to talk). Anyways, the enclosed trailer is about a 14x8 I would guess and is full of tools, nails, hoses, chords and a bunch of other stuff that has no business being in there or either needs to be thrown out. One thing is a set crappy saw horses that are beyond their prime and are just thrown in on top of everything else. This situation got me thinking I need to give him a set of folding saw horses.

So with the sawhorses on my mind I was watching a video of a fellow woodworker's on Lumberjocks, where he was building a computer table out of plywood which somehow made a light bulb go on in my head.

The problem with alot of lightweight sawhorses is that they wobble, I hate when they wobble. So I thought I could make the legs on each side out of one piece of plywood that way they would not wobble. Then I got on Google Sketchup and came up with these versatile folding sawhorses.


Click on any image to make it larger.

I have only built the one so far but it's great. It took some time to work a few kinks out but here they are. They aren't very heavy and you could easily carry two at one time, I think the leg frames could be made a bit narrower without any problem which would make them even lighter.

One thing I wanted which I have seen on a few other horses is a replaceable top board because they get cut up so easily after a while. You can also have different boards for different applications like a large clamping surface or a panel cutting jig.


They fold up nicely and are only about 4" wide. All you have to do is lift them up and they close right up, no block or pin to remove. They set up easily, just set them on the ground and ease out one leg and that's it.


They aren't very complicated, just some plywood, hinges, and some rope.


I hope other people like them as much as I do. If people find it difficult to copy them then I would be happy to redraw them up in Sketchup or even make a video on them. So let me know what you think, feel free to comment!

Saturday, January 30, 2010

About Me

I am a woodworker in my early twenties who lives in Dothan, Al. I have many hobbies, woodworing being one of the most frequented ones. I also enjoy the following: sailing, backpacking, free diving, four-wheelers, computers, guitars.

My family is in the construction industry so I grew up working with my hands. My mother owns a truss manufacturing company where I worked during the summers from when I was 13-15. As soon as I coud drive, I started working the summers with my cousin who owns a construction company doing remodeling, decks, new construction and all sorts of things. I worked with him for about four summer between highschool and college then after college I started working on more of a full-time basis and I still do today.

I have also started my own construction company where I am buying and building rental property. I hope to go out on my own full time soon concentrating on rental property with some construction and remodeling in between.

I started woodworking around 2008 with just a shopsmith, skill saw, and drills. Soon I purchased more tools including my Grizzly cabinet saw, this is when things really changed and my level of craftmanship went up quite a bit. Now my tool collection has grown quite a bit as have my skills compared to when I first started.

This blog and my videos are my way of helping other people. I learned pretty my everything I know about woodworking from books or online and I figure there are alot of people just like me who are surfing the internet looking for instruction. So this is my way of giving back to other woodworkers.

I enjoy talking with other woodworker so feel free to contact me with any questions or comments, they are more than welcomed.

Follow Here!

Following a blog is a great way to keep up with blogs that you are interested in and it's easy! Following lets the author of the blog know you are a fan and you also get notified when a blog you are following makes a new post.

It is simple to follow my blog if you have a Google account, simply look in the right column and find the "Followers" widget and click follow and your done!

If you do not have a Google account you can just save the blog to your favorites and check back whenever you like. But I think everyone should have a Google account, Google is basically...... everything the internet has to offer. Just think, all those times you hear people say "Google it!".

Contact

Feel free to contact me about whatever you like. Simply email me at sailingandsuch@gmail.com and I will do my best to get back with you as quickly as I can.

Sunday, December 20, 2009

A Bookcase for my Mother.

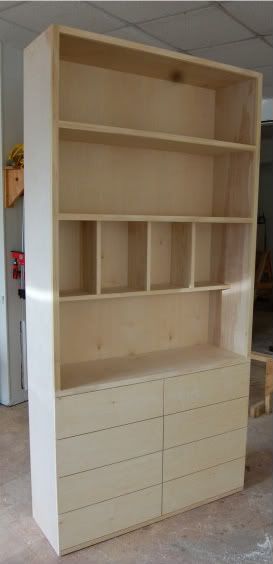
Well my mother wanted a new bookcase to go in her living room. She dreamed up a simple and a bit modern design that featured full overlay drawers and a smoothe clean look all around the piece.


Pretty simple but nice. I used 3/4" and 1/2" birch plywood for the construction and some 3/4" poplar for the face frames. I bought some full extention drawer slides from a local wholesale supplier for about $13 a pair, talk about a deal. I was paying somewhere around $20-$25 a pair, I'm glad I found these!

Anyways, I finished it will some red mahogany stain after I applied a bit of prestain right before. It was my first time using prestain and I think it may help a little bit, but not a really big difference. I then aplied 2 coats of high gloss poly to finish it off and seal the piece. I don't have a photo of that at the moment but I will try to get one up soon.

Friday, December 18, 2009

Consider Lasik eyes surgery, I am.

I just saw this morning on the news that nearsightedness in the US has risen by 41% since 1971. Thats a pretty big jump and no one really knows why, it's a fast we must live with. Another fact that is a great one is the advances in eye surgerys has advanced greatly since 1971. Sadly, I am definitely a near sighted person although it's not bad enough yet that I have contacs or surgery yet but that time will soon.

One of these surgerys is Lasik eye surgery. Not only is Lasik surgery the most performed surgery in the US, but it can reduce or eliminate the need for contact lenses. For me this would be great, because I love spending time on and in the water and contacts aren't the best things to have around water.

You can find many eye centers across the US who perform Lasik surgery but one in particular stands out, Stahl Eye Center. Stahl Eye Center has been serving their patients for more than 35 years, they have been independently verified by nonprofit Lasik patient advocacy USAEyes to meet or exceed the national norms for lasik surgerys, their doctors are graduates from top universities such as UCLA, John Hopkins and Yale.

So if you are one of the many Americans who suffer from nearsightedness or farsighteness then consider Stahl Eye Center in New York for your treatment. For some good general information check out this link.

Good luck with your choice, I know I will be getting eye surgery sometime in my future, no doubt.

Thursday, August 13, 2009

Simple Lumber Rack Plans

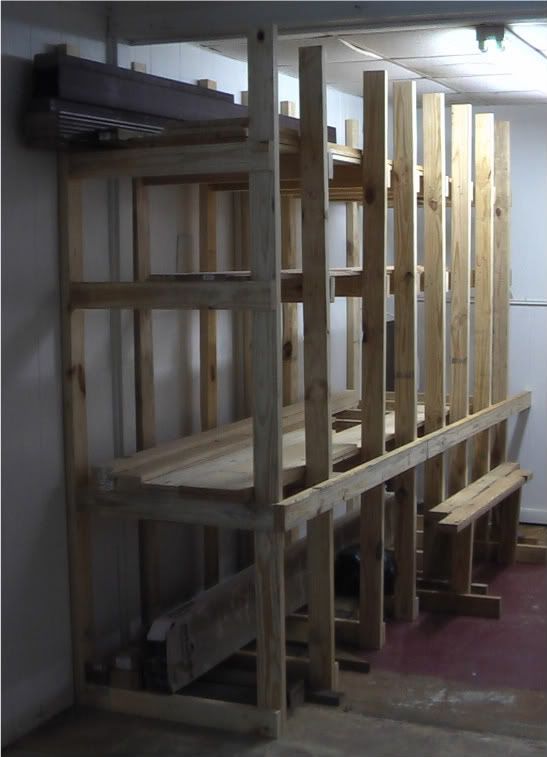
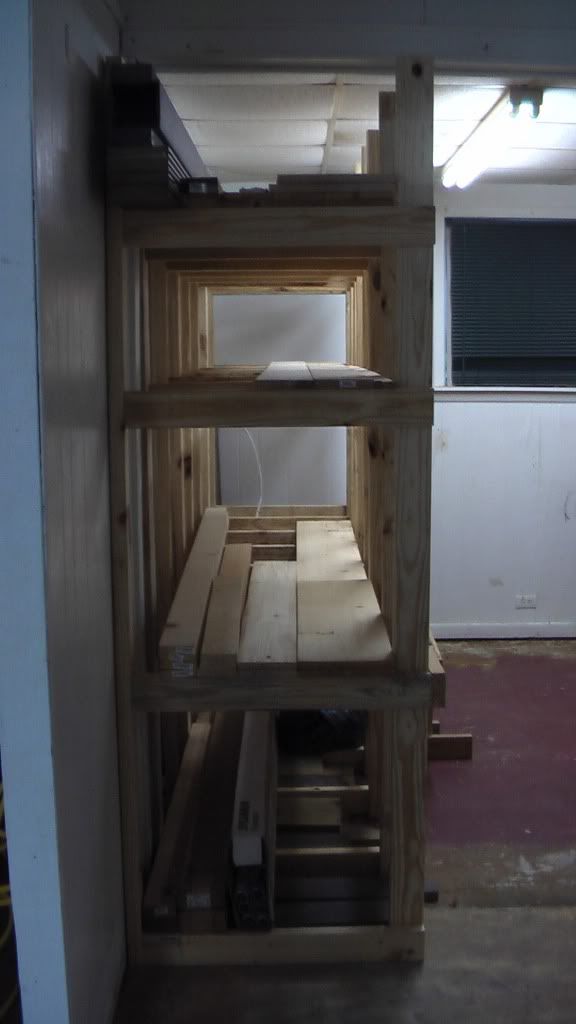
I finally built myself a simple but effective lumber rack system. I built it entirely out of 2x4's and it took me probably three hours to complete, not to bad by myself. It is large enough to store 12' long boards, and plenty of them!


The way it is designed, the lumber is supposed to be slid in and out on end. This works perfect in my shop because it is shaped like a "L". The lumber rack is right on the top of the bottom, flat part of the "L". It was definitely the best spot for my lumber rack and I will go into more detail of why in a later post.


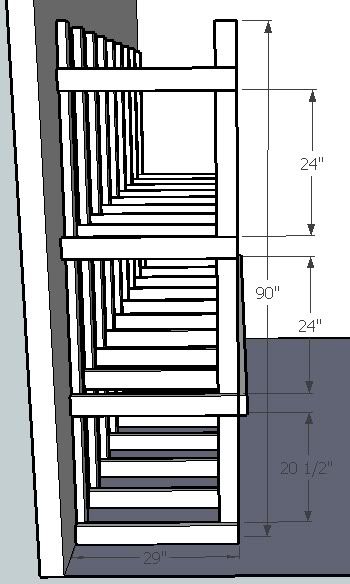
I have drawn a little set of plans on sketchup that better shows how it was put together. I built each unit with pine 2x4's and I nailed them together on the floor with a pneumatic nail gun using some old ring shank nails that I had laying around. You can use screws if you want to take the time but I think the ring shank nails will hold just about as good as a screw would. I spaced the units 16" apart to provide plenty of supports for my lumber to lay flat on and not bow. When you space them 16" apart this lets you nail each on into a stud in the wall which is needed to hold them up. I put one board down the outside of every unit to hold them all together, also it is a just the right height for a small counter top down that side. (I plan on covering the lumber rack and using the rest of the area as a finishing room and the shelf will give me somewhere to set finishing supplies.)


This was a great addition to my shop and really helped me get organized!