Browsing the LumberJocks forum, I have found that Hitachi sells reconditioned tools for pretty good deals compared to buying brand new. Reconditioned tools are pretty much new tools, they are tools that have been returned by customers to the retailer. They are all tools that could have had defects, been returned by an unsatisfied customer, returned after a weekend project, some returned brand new just because. When a tools is returned to a retailer, they cannot just put it back on the shelf, instead they have return it to the company. When this happens the company, in my case Hitachi, fixes whatever was wrong with the tools and sells them at discounted prices.
I think this is a great way to buy like new tools for great prices. The tools come with the full factory warranty.
I ordered two tools from Hitachi, both of which have great reviews on different websites like Amazon and LumberJocks. I bought the Hitachi DS18DFL 18V 1.5Ah Lithium Ion Driver Drill for $109 and the Hitachi NT50AE2 2" 18-Gauge Brad Nailer for $53 since both of mine where stolen.
Seems like a good deal to me, we will see once the tools get here!

Thursday, July 23, 2009
Had a Break-In
This past Tuesday when I arrived at my shop I realized it had been broken into in the night. The burglar broke a set of aluminum double doors on the side of my shop and stole about $600 worth of tools out of my shop.
They stole
-Senco Framing Nailer
-Senco Brad Nailer
-Bostitch Roofing Gun
-Dewalt RO Sander
-Dewalt 14.4v Cordless Drill
-Case of Kreg Pockethole Screws
-Face mask Respirator
I was so disapointed when I realized what was stolen. I hadn't gotten my insurance finalized yet so none of the items stolen where re-inbursed. Not much I can do about it now except hope that the police find my tools or that I find them in a local pawn shop. Now I am getting insurance as soon as I can!
Poplar Offereing Table
There is a small church next door to my shop and the pastor asked me if I could make them a simple offering table with a couple of drawers in it. I said sure! My first paying job, although it didn't really pay anything just materials since I am pretty new at this stuff.
Anyways, here is how it turned out, this is the first time I have ever really built drawers into a piece and I think they came out great. They are just on some wooden slides that I fabricated since the chuch didn't want to spend much money at all.


The poplar was great to work with and so is my kreg pockethole jig system. It was used to joint pretty much every piece on this table, although you would never know just looking at the table normally.
Anyways, here is how it turned out, this is the first time I have ever really built drawers into a piece and I think they came out great. They are just on some wooden slides that I fabricated since the chuch didn't want to spend much money at all.
The poplar was great to work with and so is my kreg pockethole jig system. It was used to joint pretty much every piece on this table, although you would never know just looking at the table normally.
Tuesday, July 21, 2009
Beer Pong Table
Alot of my Friends enjoy the occasional game of beer pong. It's basically a game played with Solo cups, Ping Pong balls and beer. You put beer in the cups and put them in a pyramid shape on either side of an eight foot table. Then two teams alternate turn throwing a ping pong ball into the opponents cups of beers and any cups they miss the other team has to drink them. The game keeps going until one team has run out of cups and they loose and have to drink whatever beer is left in the winner's cups.
Anyways, people always seem to be using a flimsy folding table that is either to short, to soft (the balls can't bounce for a special shot), or just not ideal for the game. So my buddy wanted a table made just for beer pong and that is just what I built him.

The table is eight foot long and two foot wide. This one is built with select grade pine to be both affordable but good looking. The entire table was coated with polyurethane with about 6 coats on the top of the table and probably four everywhere else except underneath the table top where there is only one coat. It works great and the balls bounce pretty good on it too. It only cost about $150 to build counting lumber, poly, pocket hole screws, etc.
Anyways, people always seem to be using a flimsy folding table that is either to short, to soft (the balls can't bounce for a special shot), or just not ideal for the game. So my buddy wanted a table made just for beer pong and that is just what I built him.
The table is eight foot long and two foot wide. This one is built with select grade pine to be both affordable but good looking. The entire table was coated with polyurethane with about 6 coats on the top of the table and probably four everywhere else except underneath the table top where there is only one coat. It works great and the balls bounce pretty good on it too. It only cost about $150 to build counting lumber, poly, pocket hole screws, etc.
Monday, July 20, 2009
Got some deals on some woodworking supplies!
Firday, my mother and I decided to go to a local salvage house to do some bargain shopping. The place we went to is a large freight companies "scratch and dent" store (AAA Cooper). While there was plenty of interesting things in there I only saw two things that I might could use in my shop.
One was a large roll of heavy duty paper that would be perfect to go on the side of my workbench so that I could stretch a sheet of paper across it when I want to paint or finish something, or just draw something really big. It was only $5 so I picked up a roll that should last a long time. I also grabbed a box of 100 latex gloves for one or two dollars that would come in handy some time or another.
When we were leaving the salvage house I recieved a call from a friend that was at an estate sale where there were alot of woodworking tools for cheap. I decided to ride over and I found some good tools for a good value.

-2 24" clamps $3 each
-2 2 1/2" C clamps $.50 each
-1 heavy duty square $2
I knew I could definately use some more clamps and every square that I have is a little bit out of square, even brand new ones! This one tested to be right on the money. I think from now on I will test every square before I buy it in the store.
One was a large roll of heavy duty paper that would be perfect to go on the side of my workbench so that I could stretch a sheet of paper across it when I want to paint or finish something, or just draw something really big. It was only $5 so I picked up a roll that should last a long time. I also grabbed a box of 100 latex gloves for one or two dollars that would come in handy some time or another.
When we were leaving the salvage house I recieved a call from a friend that was at an estate sale where there were alot of woodworking tools for cheap. I decided to ride over and I found some good tools for a good value.
-2 24" clamps $3 each
-2 2 1/2" C clamps $.50 each
-1 heavy duty square $2
I knew I could definately use some more clamps and every square that I have is a little bit out of square, even brand new ones! This one tested to be right on the money. I think from now on I will test every square before I buy it in the store.
Workbench / Outfeed table is looking good.
I finally took some pictures of the table today after I finished putting the trim around the edges. It really looks good and I am proud of it. It's a great work surface and is very study and stable.


I trimmed the top edge with some Douglas Fir 1x that was ripped down to the width of the table top. I fastened it with some odinary drywall screws and wood glue, countersinking every screw so that I can come back and put some dowels in the holes to clean it up a bit. Be sure not to over tighten the screws when your attaching these and I put on plenty of glue expecting the MDF to soak it right up.
I still plan on putting a vice on the right end of the table and I am going to have to order some leveling legs for it because what I had planned for legs just didn't work out (some threaded shafts and a couple nuts).
Homemade Vacuum Cyclone Test
I completed the dust cyclone for my shop vacuum. To finish up, all I needed to do was to secure the pipe through the plywood on the top of the funnel. I did this with some rubber strips, zip-ties, and caulking. It may have been the bost choice so I may go back and do it with some 1 min epoxy (I like that stuff!).
Then I glued the plywood into the top of the funnel with a small rubber strip around the plywood to tighten the fit and to help seal it. Then I just used some normal wood glue to hold it in place. We will see how this holds, epoxy would have worked well here also.
Then I simply put the two couplings on each pipe and attached my shop vac hose and I was done!
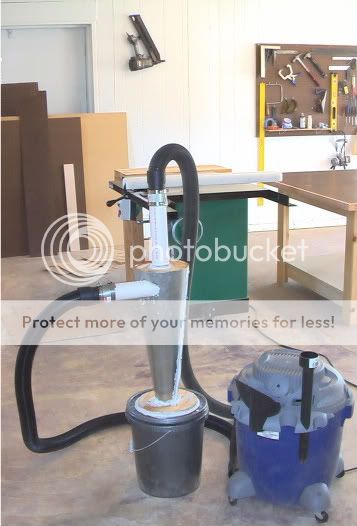
Overall, the system really worked great. The only problem was that the 5 gallon bucket wasn't strong enough and would try to collapse if I covered the open end of the hose completely. The bucket I have is thinner than normal buckets so i'll just have to get a thicker one then I should be fine I hope.
It really amazed me at how clean the filter and shop vac can was. I sucked up a pretty good bit of saw dust and smaller particles that I swept up off the floor, all in all about 1/3 of a 5 gallon bucket. The shop vac was empty except for a few long shavings some other larger pieces of trash that I was curious about. The filter looked good and clean so this thing really made a big improvment, glad I built it. You should really consider building one too!
Then I glued the plywood into the top of the funnel with a small rubber strip around the plywood to tighten the fit and to help seal it. Then I just used some normal wood glue to hold it in place. We will see how this holds, epoxy would have worked well here also.
Then I simply put the two couplings on each pipe and attached my shop vac hose and I was done!
Overall, the system really worked great. The only problem was that the 5 gallon bucket wasn't strong enough and would try to collapse if I covered the open end of the hose completely. The bucket I have is thinner than normal buckets so i'll just have to get a thicker one then I should be fine I hope.
It really amazed me at how clean the filter and shop vac can was. I sucked up a pretty good bit of saw dust and smaller particles that I swept up off the floor, all in all about 1/3 of a 5 gallon bucket. The shop vac was empty except for a few long shavings some other larger pieces of trash that I was curious about. The filter looked good and clean so this thing really made a big improvment, glad I built it. You should really consider building one too!
Sunday, July 19, 2009
Starting some Adirondack Chairs for a wedding gift.
My sister is getting married in one month and I have decided to build a pair of Adirondack chairs to give to her and her fiance. I have never built any before but they look easy enough, can't be to hard!

I hear of people building and selling the Adirondack chairs. I wouldn't mind selling a few if I could make a decent profit on them but I will have to find somewhere to sell them. This weekend my girlfriend and I went to the local flea market and there were some nice Adirondack chairs there that were selling for $75 for the most basic single design. They were all completely unfinished and would need some sort of finishing before they could be sat outside in the weather.
Sounds like if I primed and painted them I could sell them for at least $150 each. It doesn't take alot of materials to build one and shouldn't take to much time, especially when you could get a system going and good pattern.
We will see.....
Friday, July 17, 2009
Not a very productive day....
Went to the shop this morning and checked on my cyclone. The caulking wasn't are hard as I was hoping it would be. It was still pretty soft to the touch and I am afraid that it may just suck into the seams when the vacuum is turned on. Maybe it just didn't cure enough, so I am going to let it sit for the weekend and check it on Monday.
Today I did work on my workbench a little more though. All I really had left to do was to put the trim around the edges of the table top. I went to Lowe's and bought some 1x3 Douglas Fir and ripped it down to 1 5/8" which is the thickness of the table top. Then I cut the pieces to fit on miters and began countersinking/drilling then glueing and screwing them on.
I had a pretty busy day and I wasn't able to spend as much time in the shop as I had hoped. We will see how next week goes, maybe I will start on some of the cabinets for the shop!
Thursday, July 16, 2009
Homemade DIY Dust Deputy - Part 1
I have decided to make my own dust collector for my shop vac, something very similar to the Dust Deputy just cheaper and hopefully just as efficient. I got the idea from a member of Lumberjocks, jcoulam . He built one himself and put a couple of photos on the Internet and basic drawing which gave me inspiration in making my own. I figured I would create basically the same thing and I would provide more photos and descriptions of how it was done.
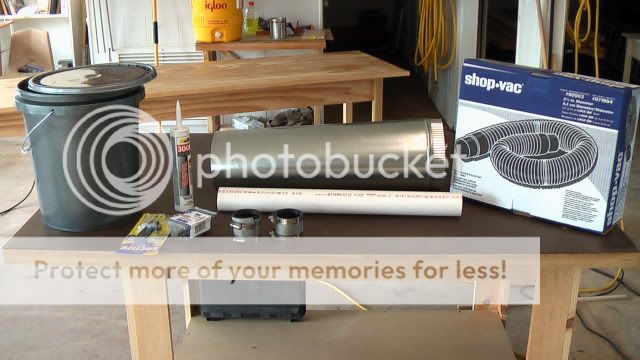
I went to Lowe's and bought a few supplies that I would need.
-1 8"x24" piece of galvanized pipe that is split down the length
-1 new 5 gallon bucket and a lid that fit securely
-1 2' piece of 2" PVC
-2 2" plumbing couplings
-1 8'x2 1/2" Shop Vac hose
-1 syringe of 1 min epoxy
-A small amount of self tapping metal screws
-1 tube of caulk
The first thing that I wanted to accomplish was to get the funnel made. I tried it without cutting the piece of pipe hoping to just trim it when I had the final shape and it held securely. This proved to be pretty difficult so I went for a little professional help, my mother's engineer at the truss company who is brilliant at this sort of thing.
We sat down and he came up with pattern that I could lay out on my piece of sheet metal and just cut out my funnel. To do this he used all sorts of math from college that I have forgotten and some odd formulas. In a few minutes we were drawing the cut pattern onto the sheet metal. When I put the cut piece of metal to the test and fastened it together it came out perfect! No cutting necessary. When you screw the funnel together it's best to predrill holes in the overlapping piece so that the screws will pull the underside piece tight.
(I will come back and post the dimensions and figures at a later date so that everyone can do this the easy way.)

The next thing I did was cut a circle out of a piece of 1/2" plywood that was a little bit smaller than top of the funnel so that it could sit down in the funnel just a grunt. This ended up being about a 7 7/8" diameter circle with a 2" hole cut in the middle of it to allow for the PVC to pass though.
Next I had to cut a whole in the funnel so that a piece of 2" PVC could be inserted at an angle. This wasn't very difficult, I just held the piece of pipe above the funnel and drew what looked like the correct cut on the pipe then whacked it off on the band saw. It really doesn't have to be perfect I don't think, just close. Then I took that piece of PVC with the angle cut and placed against the funnel where it would go through at and traced around the sides of it to give me a hole to cut. Cutting this with my jig saw was pretty easy with a fine tool metal blade.

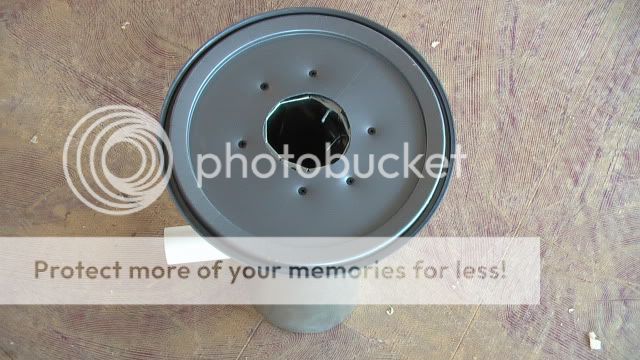
Next I cut another piece of plywood that was a bit smaller than the size of the 5 gallon bucket lid and cut a hole in the center of it large enough to allow about an inch or so if the funnel to pass through it, I think the hole was about 3". Then I cut slits in the part of the funnel that was sticking out and folded them back and screwed it to the plywood. Since I was using wood screws to get a bite in the ply wood I predrilled all the holes in the metal flanges first.

Next I cut a hole in the lid of the 5 gallon bucket and fastened it to the bottom piece of plywood.
Now it was time to start gluing a caulking things. I first used the 1 minute epoxy to secure the piece of PVC in the side of the funnel. Don't put the plywood in the top before doing this because it helps to apply some epoxy on the inside of the funnel here.
Then I caulked around the base of the funnel, the seam in the funnel, and in between the bucket top and the piece of plywood. I loosened the screws between the bucket top and plywood so that I could get a good bit of caulk in here. I sat the funnel upright for the night to let it dry before tightening the screws. The weight of the funnel is pretty good at this point and keeps the joint there decently tight. Now when I tighten the screws in the morning the caulk will act as a gasket (learned that from sailboats although most of you reading probably already know that).

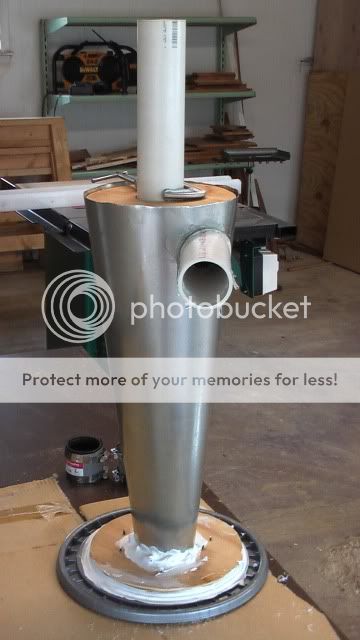
That is all I had time for today and I hope to finish it tomorrow and see how well it works! As you can tell in the above picture I didn't have the top piece of plywood fastened or caulked in place.
I went to Lowe's and bought a few supplies that I would need.
-1 8"x24" piece of galvanized pipe that is split down the length
-1 new 5 gallon bucket and a lid that fit securely
-1 2' piece of 2" PVC
-2 2" plumbing couplings
-1 8'x2 1/2" Shop Vac hose
-1 syringe of 1 min epoxy
-A small amount of self tapping metal screws
-1 tube of caulk
The first thing that I wanted to accomplish was to get the funnel made. I tried it without cutting the piece of pipe hoping to just trim it when I had the final shape and it held securely. This proved to be pretty difficult so I went for a little professional help, my mother's engineer at the truss company who is brilliant at this sort of thing.
We sat down and he came up with pattern that I could lay out on my piece of sheet metal and just cut out my funnel. To do this he used all sorts of math from college that I have forgotten and some odd formulas. In a few minutes we were drawing the cut pattern onto the sheet metal. When I put the cut piece of metal to the test and fastened it together it came out perfect! No cutting necessary. When you screw the funnel together it's best to predrill holes in the overlapping piece so that the screws will pull the underside piece tight.
(I will come back and post the dimensions and figures at a later date so that everyone can do this the easy way.)
The next thing I did was cut a circle out of a piece of 1/2" plywood that was a little bit smaller than top of the funnel so that it could sit down in the funnel just a grunt. This ended up being about a 7 7/8" diameter circle with a 2" hole cut in the middle of it to allow for the PVC to pass though.
Next I had to cut a whole in the funnel so that a piece of 2" PVC could be inserted at an angle. This wasn't very difficult, I just held the piece of pipe above the funnel and drew what looked like the correct cut on the pipe then whacked it off on the band saw. It really doesn't have to be perfect I don't think, just close. Then I took that piece of PVC with the angle cut and placed against the funnel where it would go through at and traced around the sides of it to give me a hole to cut. Cutting this with my jig saw was pretty easy with a fine tool metal blade.
Next I cut another piece of plywood that was a bit smaller than the size of the 5 gallon bucket lid and cut a hole in the center of it large enough to allow about an inch or so if the funnel to pass through it, I think the hole was about 3". Then I cut slits in the part of the funnel that was sticking out and folded them back and screwed it to the plywood. Since I was using wood screws to get a bite in the ply wood I predrilled all the holes in the metal flanges first.
Next I cut a hole in the lid of the 5 gallon bucket and fastened it to the bottom piece of plywood.
Now it was time to start gluing a caulking things. I first used the 1 minute epoxy to secure the piece of PVC in the side of the funnel. Don't put the plywood in the top before doing this because it helps to apply some epoxy on the inside of the funnel here.
Then I caulked around the base of the funnel, the seam in the funnel, and in between the bucket top and the piece of plywood. I loosened the screws between the bucket top and plywood so that I could get a good bit of caulk in here. I sat the funnel upright for the night to let it dry before tightening the screws. The weight of the funnel is pretty good at this point and keeps the joint there decently tight. Now when I tighten the screws in the morning the caulk will act as a gasket (learned that from sailboats although most of you reading probably already know that).
That is all I had time for today and I hope to finish it tomorrow and see how well it works! As you can tell in the above picture I didn't have the top piece of plywood fastened or caulked in place.
Wednesday, July 15, 2009
Shop Vac as a dust collector.
Currenty in my ever evolving shop I am using a 12 gallon shop vac as my only means of dust collection. It works on some machines pretty well: my sander, miter saw, Kreg Jig, and router table. I can't hook it up to my table saw yet or my skil saw which I have been using to rip panels of MDF the past couple of days (which is working pretty well!).
I can't hook it up to my table saw because the dust port is larger than the hose on the vac, probably 4" when the hose is probably 2 1/2"-3". I checked at my local Lowe's but I was unable to find a converter that would work. I haven't really tried to hard to jerry-rig some sort of setup. My Dewalt skill saw just doesn't have anywhere to attatch a vaccuumm hose.
A bigger problem is the fact that the filter on the shop vac gets clogged and the vacuum's suction power deminishes. I have been looking online at the Onieda Dust Deputy system. Basically it's a 5 gallon bucket with a funnel on top that removes the particles and suposedly most of the dust that clogs up the filter.

The Dust Deputy
I have read reviews online and people have given the Dust Deputy pretty good remarks, so I guess I will give it a try. If it works it should be worth the money!
I can't hook it up to my table saw because the dust port is larger than the hose on the vac, probably 4" when the hose is probably 2 1/2"-3". I checked at my local Lowe's but I was unable to find a converter that would work. I haven't really tried to hard to jerry-rig some sort of setup. My Dewalt skill saw just doesn't have anywhere to attatch a vaccuumm hose.
A bigger problem is the fact that the filter on the shop vac gets clogged and the vacuum's suction power deminishes. I have been looking online at the Onieda Dust Deputy system. Basically it's a 5 gallon bucket with a funnel on top that removes the particles and suposedly most of the dust that clogs up the filter.
The Dust Deputy
I have read reviews online and people have given the Dust Deputy pretty good remarks, so I guess I will give it a try. If it works it should be worth the money!
Tuesday, July 14, 2009
My Shop: The Beginning
I have what I consider a fairly large shop and I am very thankful to have access to it. The building is owned by my mother's truss manufacturing company which is located in a small industrial park in Dothan, Al. The building I am using is one of the smaller buildings in the park but it is turning out to be a good workshop.
I have actually had tools in the shop for over a year now, I first put them in there when I was making furniture out of some reclaimed heart pine that I had easy access too and was able to get it at a good price. The economy was falling out when I started that so it seemed that no one wanted to buy furniture made out of the expensive wood. Anyways, that little venture opened my eyes up to the world of furniture making.
In the past few months I have gotten serious bout fixing the shop up and getting some quality tools inside. I have fixed a few leaks in the flat tar roof but there are still a few which I am hoping to spend some time on this week.
Here are some photos of the shop right now. The things that I have added in the past couple of months are: the 3 different sets of shelves, the Grizzly table saw, the sawhorses that are being used as lumber storage, the stackable saw horses, the small pegboard board, shop vac

Here you can see an old metal drafting table that I have been using as a workbench and an assembly table and it does neither one well. The top on the thing is warped big time so everything is out of wack that I try to assemble on the table. I usually work on the side with the drawers so thats where my clamps clamp onto and the drawers always get in the way, and the overhang isn't sufficient.
Behind that you can see a small pegboard board that I put up to get some of my handtools off the floor and the old desk, boy was this helpful although the clips in the pegboard don't stay on as good as I had hoped even with the little black clips that are supposed to help. The shelves there are some that I recently put in the shop that I got from a remodel job.

In this picture you can see my "miter saw stand" that I built with some 2x4's. It serves it's purpose to hold up longer boards when they are being cut but that is it. I plan on building cabinets down this wall with the miter saw built into them. There are my stackable saw horse, and some green metal shelving that we had in storage. I think they came out of a grocery store or something, they aren't very sturdy as they stand there because they don't have the correct bracing. I am probably going to do away with these.
There are a few sheet goods stored against the wall there and one half sheet of pegboard leaning against the metal double doors. Last but not least my new Grizzly table saw (if you look closely you can tell this picture was taken before I had the saw hooked up to 220v).
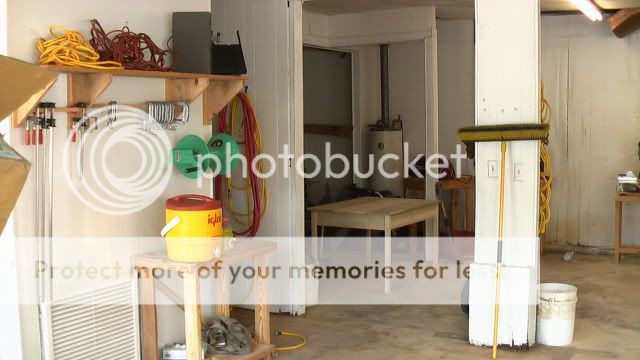
In this photo is a shelf that I built about a year ago just to get a few of my power tools off the floor. I recently put a few pieces of 1 by between the braces to hold a few clamps. Underneath that is a small table that I build while I was building my plywood sailing dingy. Also right in that area is my new Grizzly air hose reel. At this point I hadn't installed the hose on the reel yet.
Just beyond that you can see a few air hoses hanging up in the entrance to the hallway which goes back a pretty good ways. Down it are two bathrooms and a side door.
There is a poplar table that I built for a local church as an offering table. To the left of it is another area that i am currently using to store lumber and my shop smith stuff.
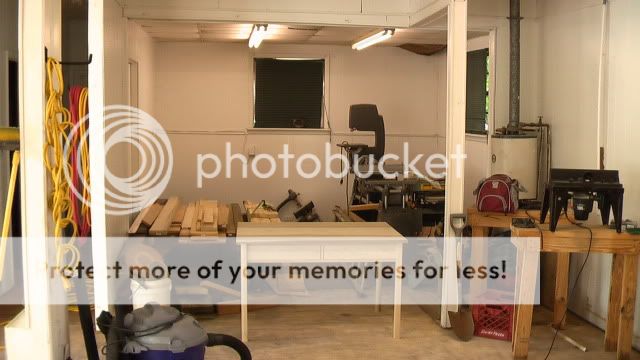
Here you can see the storage area with the lumber and the shopsmith. I bought the shopsmith when I was getting into the heart pine furniture in hopes that it would do everything I needed to make the furniture. It is capable of doing alot of things but not many of them very well so I think it has to go. It has the table saw, band saw, scroll saw attachments and I even have the planer/jointer.
To the right are two rickety "tables" I made out of 2x4's. One has a skil router table on it which I don't plan on using much longer. I want to build a router table and maybe incorporate the skil table into it.


Here is the front corner of the shop with some big windows that let in alot of natural light (and alot of heat!).

Here you can see the boxes that the table saw arrived in, I am keeping them few a few days to make sure that the table saw is in good working order. If something is damaged I would need the boxes as proof that the damage could have occurred during shipping. Luckily it looks like the saw is unscathed.
Just to the right of that is a table that I built out of heart pine that I am using as a desk right now. Behind that is the door to a small office that I am currently storing some of the heart pine furniture that I built in. Also you can see the 3rd shelf unit that I added to the shop recently to the right of the table.
That's about it! I plan on making alot of improvements in the next few months, maybe I can get some furniture to build too!
I have actually had tools in the shop for over a year now, I first put them in there when I was making furniture out of some reclaimed heart pine that I had easy access too and was able to get it at a good price. The economy was falling out when I started that so it seemed that no one wanted to buy furniture made out of the expensive wood. Anyways, that little venture opened my eyes up to the world of furniture making.
In the past few months I have gotten serious bout fixing the shop up and getting some quality tools inside. I have fixed a few leaks in the flat tar roof but there are still a few which I am hoping to spend some time on this week.
Here are some photos of the shop right now. The things that I have added in the past couple of months are: the 3 different sets of shelves, the Grizzly table saw, the sawhorses that are being used as lumber storage, the stackable saw horses, the small pegboard board, shop vac
Here you can see an old metal drafting table that I have been using as a workbench and an assembly table and it does neither one well. The top on the thing is warped big time so everything is out of wack that I try to assemble on the table. I usually work on the side with the drawers so thats where my clamps clamp onto and the drawers always get in the way, and the overhang isn't sufficient.
Behind that you can see a small pegboard board that I put up to get some of my handtools off the floor and the old desk, boy was this helpful although the clips in the pegboard don't stay on as good as I had hoped even with the little black clips that are supposed to help. The shelves there are some that I recently put in the shop that I got from a remodel job.
In this picture you can see my "miter saw stand" that I built with some 2x4's. It serves it's purpose to hold up longer boards when they are being cut but that is it. I plan on building cabinets down this wall with the miter saw built into them. There are my stackable saw horse, and some green metal shelving that we had in storage. I think they came out of a grocery store or something, they aren't very sturdy as they stand there because they don't have the correct bracing. I am probably going to do away with these.
There are a few sheet goods stored against the wall there and one half sheet of pegboard leaning against the metal double doors. Last but not least my new Grizzly table saw (if you look closely you can tell this picture was taken before I had the saw hooked up to 220v).
In this photo is a shelf that I built about a year ago just to get a few of my power tools off the floor. I recently put a few pieces of 1 by between the braces to hold a few clamps. Underneath that is a small table that I build while I was building my plywood sailing dingy. Also right in that area is my new Grizzly air hose reel. At this point I hadn't installed the hose on the reel yet.
Just beyond that you can see a few air hoses hanging up in the entrance to the hallway which goes back a pretty good ways. Down it are two bathrooms and a side door.
There is a poplar table that I built for a local church as an offering table. To the left of it is another area that i am currently using to store lumber and my shop smith stuff.
Here you can see the storage area with the lumber and the shopsmith. I bought the shopsmith when I was getting into the heart pine furniture in hopes that it would do everything I needed to make the furniture. It is capable of doing alot of things but not many of them very well so I think it has to go. It has the table saw, band saw, scroll saw attachments and I even have the planer/jointer.
To the right are two rickety "tables" I made out of 2x4's. One has a skil router table on it which I don't plan on using much longer. I want to build a router table and maybe incorporate the skil table into it.
Here is the front corner of the shop with some big windows that let in alot of natural light (and alot of heat!).
Here you can see the boxes that the table saw arrived in, I am keeping them few a few days to make sure that the table saw is in good working order. If something is damaged I would need the boxes as proof that the damage could have occurred during shipping. Luckily it looks like the saw is unscathed.
Just to the right of that is a table that I built out of heart pine that I am using as a desk right now. Behind that is the door to a small office that I am currently storing some of the heart pine furniture that I built in. Also you can see the 3rd shelf unit that I added to the shop recently to the right of the table.
That's about it! I plan on making alot of improvements in the next few months, maybe I can get some furniture to build too!
My first workbench and cuts with the table saw.
With a new table saw I of course wanted to start cutting with it right away, what better way to do that then to make an outfeed table for it? I decided to make a hybrid outfeed table/workbench to save on some room in the shop, although I am not cramped yet I think I will be satisfied with the bench.
Every woodworker wants something different that fits their needs. I knew that I wanted a good outfeed table and I also needed a workbench I started looking online for different ideas. I found a good video done by the Wood Whisperer about an outfeed table built from 3/4" plywood. I really liked the table and I was going to build that at first before I decided to make it a multifunctional table.
I wanted a good heavy table with a vice and maybe some bench dogs, I wanted to be able to clamp things to it, and I wanted it to be stout, sturdy and flat. So I changed the WW's outfeed table design a bit and added a 4" overhang on three sides of the table and about a 9" overhang on one side for a vice. I wanted to table good and heavy so I decided to put two pieces of plywood on the top instead of one and then a piece of hardboard on top of it.
So I went to Lowe's and purchased three sheets of 3/4" birch plywood for about $42 a piece, talk about expensive! I brought them to the shop and planned on starting the bench the following day. That evening I was talking with the engineer at my mother's truss manufacturing company and he suggested that I just use some "1 by" pine instead of the expensive plywood for the framing. Also, I had been debating using MDF on the top instead of plywood to save on a few bucks. So this is the way I went, a bench built out of "1 by" pine and MDF.
The difference in price was a pretty good bit. The three pieces of MDF were $78 total compared to the $126 plywood sheets. I had enough pine scrap on hand to build the frame and then some. Overall it was much cheaper and now I have three sheets of nice birch plywood in the shop.
I didn't have much 1x4 pine to use for the framing but I had plenty of 1x10 and 1x12 pine boards that were old and warped to the point that they were unusable as a large piece. When I ripped the pine boards down to size they warp wasn't noticeable. This turned out good because I was forced to rip all the boards down on my new table saw!
Anyways, I cut all the boards for the framing to length before I began assembling the frame, which didn't take long. I got the frame glued, tacked, and screwed together and it is pretty sturdy.


I did get one piece of the MDF top cut but not attached to the frame yet. I was by myself so I was unable to cut it on the tablesaw by myself so I used my Dewalt skill saw and a long metal ruler as a guide. It was the first time I had used a guide to cut sheet goods and it worked surprisingly well.
Every woodworker wants something different that fits their needs. I knew that I wanted a good outfeed table and I also needed a workbench I started looking online for different ideas. I found a good video done by the Wood Whisperer about an outfeed table built from 3/4" plywood. I really liked the table and I was going to build that at first before I decided to make it a multifunctional table.
I wanted a good heavy table with a vice and maybe some bench dogs, I wanted to be able to clamp things to it, and I wanted it to be stout, sturdy and flat. So I changed the WW's outfeed table design a bit and added a 4" overhang on three sides of the table and about a 9" overhang on one side for a vice. I wanted to table good and heavy so I decided to put two pieces of plywood on the top instead of one and then a piece of hardboard on top of it.
So I went to Lowe's and purchased three sheets of 3/4" birch plywood for about $42 a piece, talk about expensive! I brought them to the shop and planned on starting the bench the following day. That evening I was talking with the engineer at my mother's truss manufacturing company and he suggested that I just use some "1 by" pine instead of the expensive plywood for the framing. Also, I had been debating using MDF on the top instead of plywood to save on a few bucks. So this is the way I went, a bench built out of "1 by" pine and MDF.
The difference in price was a pretty good bit. The three pieces of MDF were $78 total compared to the $126 plywood sheets. I had enough pine scrap on hand to build the frame and then some. Overall it was much cheaper and now I have three sheets of nice birch plywood in the shop.
I didn't have much 1x4 pine to use for the framing but I had plenty of 1x10 and 1x12 pine boards that were old and warped to the point that they were unusable as a large piece. When I ripped the pine boards down to size they warp wasn't noticeable. This turned out good because I was forced to rip all the boards down on my new table saw!
Anyways, I cut all the boards for the framing to length before I began assembling the frame, which didn't take long. I got the frame glued, tacked, and screwed together and it is pretty sturdy.
I did get one piece of the MDF top cut but not attached to the frame yet. I was by myself so I was unable to cut it on the tablesaw by myself so I used my Dewalt skill saw and a long metal ruler as a guide. It was the first time I had used a guide to cut sheet goods and it worked surprisingly well.
Sunday, July 12, 2009
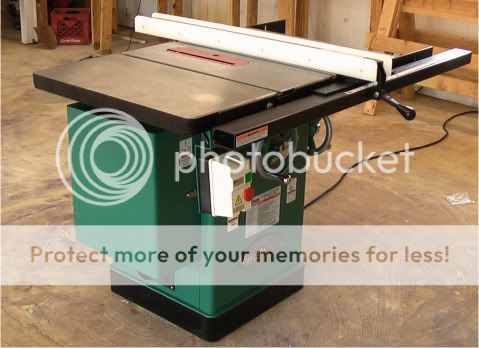
Assembling my Grizzly 1023SL
Saturday I was unable to get away to the shop but I made it Sunday morning with high hopes about getting my new table saw put together. Overall the assembly was pretty easy and straight forward, and I have it all together except for the blade guard witch I may or may not put on later.

Although, I didn't have the resources or the time to get power to the saw so I never got the chance to cut anything with it. That will be my assignment first thing in the morning though. The saw is 220v so I can't just plug it up to a regular socket. Luckily I do have 220 in my shop but the plug isn't really close to the saw and it looks like I will need to purchase about 16' of the appropriate cord to get it ran. I also have to buy a plug because the saw doesn't come with one since there are various 220 plug arrangements. This shouldn't be a problem but it just means another trip to Lowe's. Can't complain about that because when you are setting up a shop it seems like there is ALWAYS something else you need.
I even went to Lowe's today in search of some wiring things to get the saw running but when I arrived it seems that I didn't do enough research back at my shop to see just exactly what I needed to get the saw running. I did however pick up three sheets of 3/4" birch plywood to build a nice outfeed table out of though. That will be the first thing I build using the new table saw, I can't wait.
It arrived.......
Well, I called UPS Freight the next morning and I was notified that the saw should be delivered that day sometime between 2-4pm. So, I wait around another day in anticipation and at 4:30 I receive a phone call from the truck driver asking how much longer I was planning on waiting. I told him that I didn't want to stay past 5 so he came right over before his other stops.
About 15 minutes later I was unloading the saw with the forklift from my mother's truss plant right next door (this saw isn't something you can just lift). With only a few minutes till I had to head home to get ready to go out to dinner with some friends and slid the pallet through the door of my shop and took off the box and there she sat. Luckily the box wasn't in horrible shape so the saw looked pretty much untouched and in great condition. Sadly, I didn't have time to put it together and get it running so I had to leave my new toy until Sunday.


About 15 minutes later I was unloading the saw with the forklift from my mother's truss plant right next door (this saw isn't something you can just lift). With only a few minutes till I had to head home to get ready to go out to dinner with some friends and slid the pallet through the door of my shop and took off the box and there she sat. Luckily the box wasn't in horrible shape so the saw looked pretty much untouched and in great condition. Sadly, I didn't have time to put it together and get it running so I had to leave my new toy until Sunday.
Thursday, July 9, 2009
Let down today......
I wake up this morning early without an alarm clock excited about my new saw. According to the tracking information the saw should be delivered sometime today because it is already in town so it just needs to be trucked over to my shop. I even called UPS Frieght yestarday afternoon to ask for an approximate time that should be expecting the delivery, they told me that were no sure but would call back withing 30 minutes. Well of course I never heard back from them, until today....
This afternoon at 3pm I recieve a call from UPS saying that my saw will delivered the following day......... So that means that I wasted an entire day waiting for nothing! Nothing was accomplished!
We will see how tomorrow goes.................
This afternoon at 3pm I recieve a call from UPS saying that my saw will delivered the following day......... So that means that I wasted an entire day waiting for nothing! Nothing was accomplished!
We will see how tomorrow goes.................
Wednesday, July 8, 2009
I ordered a new table saw!
Great news! I have ordered a new table saw and it should be arriving some time tomorrow, I can't wait, its like Christmas.....

I ordered a professional grade cabinet saw, the Grizzly 1023SL. I have been wanting a new table saw for quite some time now but I have been putting it off due to a couple reasons (the leaking roof which isn't perfectly fixed but it is much better than it was, and lack of funds for a new toy), but I decided that it was time to jump.
Deciding what table saw to purchase was definitely a tough decision, but it was fun researching and learning so much about different table saw on the market. When I first looked at table saws I was looking at something in the $600-$900 range. I was liking the contractor saws that I was finding on the Rockler website, they were the only ones that fit in my budget and that was the only place I really knew to look for saws.
So I decided on a saw but then I couldn't decide which fence I wanted with it since there were three different options, the best which was about $300 dollars more than the basic fence. I decided to join a woodworking forum and ask people who actually knew what they were talking about. So that is when I found Lumberjocks.com, and I am glad I did as the community was most helpful.
I asked my question and people started chiming in with suggestions. A few people said that I should skip the contractor saw and just go with a professional grade cabinet saw for $200 more than $900 contractors saw that I was eyeing. The saw that was suggested was the Grizzly 1023SL. After reading countless reviews and asking more and more questions on the forum I realized that all of the experienced folks at Lumberjocks knew what they were talking about so I decided to fork out a bit more money and get the full blown cabinet saw.
I think I will glad that I choose the cabinet saw over the contractor saw because the price wasn't an extreme difference but the quality of the saw should be a big difference. Looks like we will see tomorrow!
Subscribe to:
Posts (Atom)